How to Deploy Into Hostinger Using DeployBot
As a developer, you've poured countless hours into crafting the perfect codebase for your project. Every line of code has been meticulously written, every feature carefully implemented, and every bug relentlessly squashed. But then comes the dreaded task: deployment.
Manual deployments can quickly turn into a developer's worst nightmare. Juggling multiple environments, managing version control, and ensuring seamless integration can be a time-consuming and error-prone process. One missed step, and your hard work could be undone, leaving your application vulnerable to downtime, security risks, or worse – catastrophic data loss.
But what if I say there was an easier and faster way to streamline this process, eliminating the headaches and minimizing the risks associated with manual deployments? Enter the dynamic duo of Hostinger, a reliable and user-friendly hosting platform, and DeployBot, a powerful deployment tool that automates the entire code deployment process.
Imagine a world where you can confidently push your code, knowing that DeployBot will seamlessly handle the deployment process for you. No more late nights spent manually transferring files or frantically troubleshooting deployment issues. With DeployBot, you can sit back and watch as your code is automatically deployed to your Hostinger server, ensuring a smooth and consistent experience for your users.
But the benefits don't stop there. By combining the power of Hostinger and DeployBot, you'll also gain access to robust features like zero-downtime deployments, rollback capabilities, and comprehensive deployment logs – all designed to give you peace of mind and keep your application running smoothly.
So, in today’s guide post, I'll dive into the intricacies of deploying into Hostinger using DeployBot, guiding you through the complete setup process and sharing best practices for streamlining your workflow.
Whether you're a seasoned developer or just starting your journey, this powerful combination will revolutionize how you approach deployments, freeing up valuable time and resources to focus on what truly matters: building amazing applications. So let’s get on with it, shall we? But before that, starting with understanding the basics…
What Is DeployBot?
DeployBot is a software created to help developers build and ship code to multiple servers with a single click. This tool promotes a consistent and easy code deployment system with its manual and automated workflow.
How Does DeployBot Facilitate Code Deployment?
DeployBot is a one-click solution that eliminates the difficulties in code shipment. Here are the key benefits of leveraging DeployBot as a code deployment tool:
- Manual & automatic deployments: It includes both manual and automatic deployment for selecting an appropriate deployment system for the right environment.
- Simultaneous code shipment: DeployBot can instantly ship code to multiple servers with a single click.
- Zero downtime: It ensures zero downtime for atomic deployment.
- Deploy notification: This tool notifies you whenever a deployment takes place.
- Third-party integrations: Through New Relic and Bugsnag, you can observe performance and application stability.
- Rapid rollback: It protects you from problematic releases with a quick rollback feature.
- Custom roles & permissions: DeployBot allows you to control the permissions and access of your team members.
- Simple configuration: Setting up the server or other configuration is super smooth using DeployBot.
Deploying Into Hostinger Using DeployBot in 4 Simple Steps
DeployBot, the fully functional and friendly code deployment tool, offers the easiest integration with different hosting providers. This makes code deployment as smooth as possible. Here, we’ll walk you through how to deploy into Hostinger using DeployBot by adopting 4 steps. So, let’s dive in to experience the simplest code deployment process with Hostinger and DeployBot:
Step 1: Signup DeployBot
Creating an account on DeployBot is a prerequisite to deploying into Hostinger, the web hosting platform. To start with the main configuration, you must first sign up for DeployBot using your name and email. Then press the “Create an account” button. Thus, you will be redirected to your account.

Step 2: Connect the Repository with DeployBot
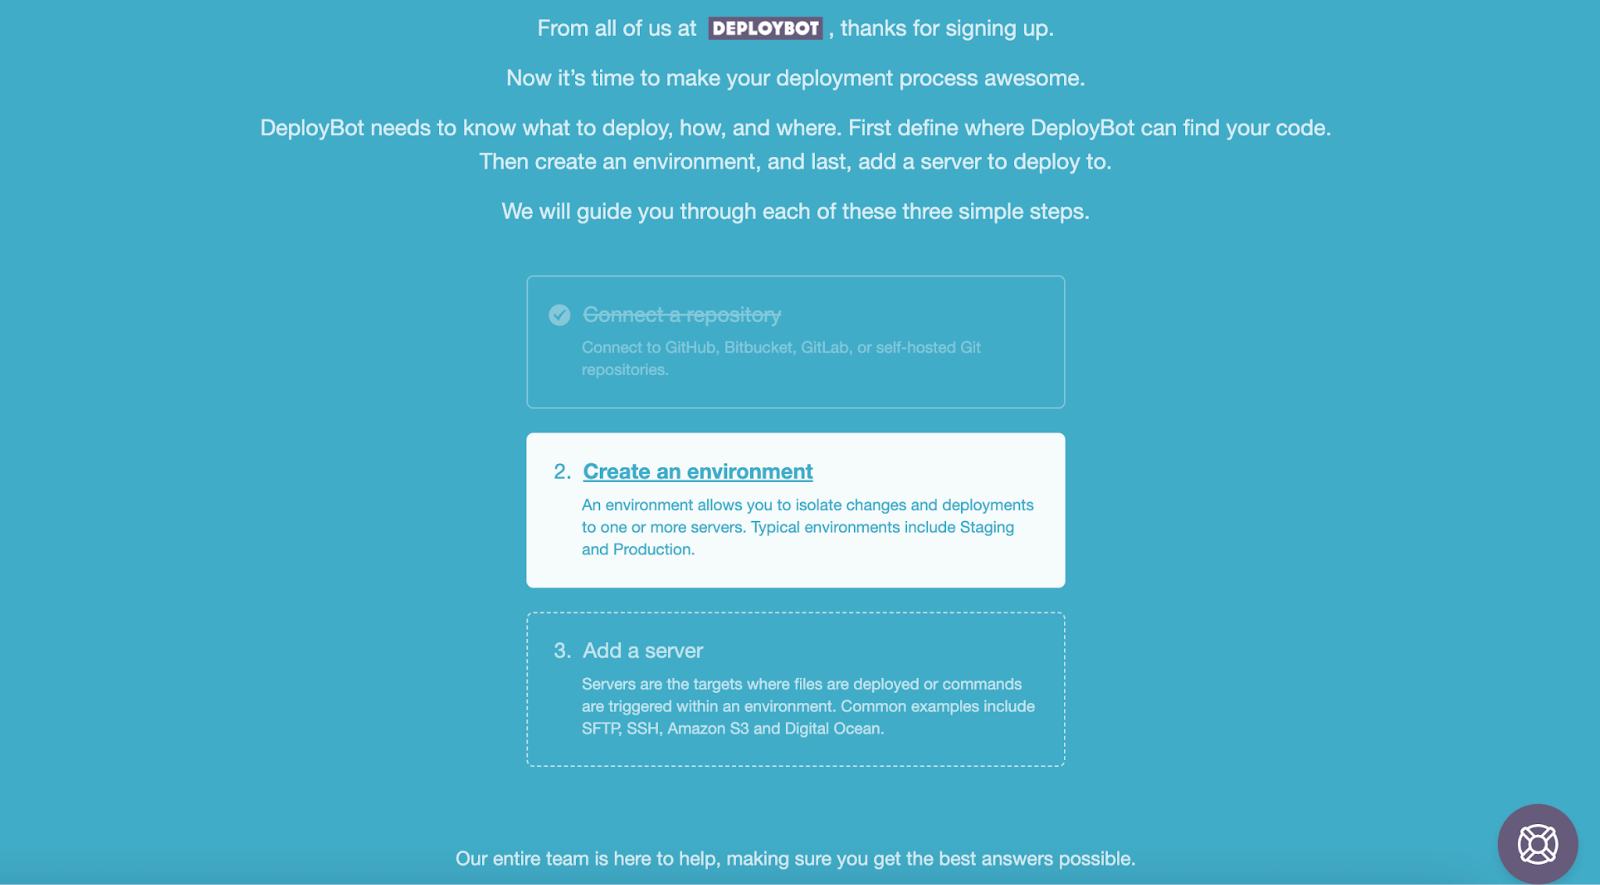
After redirecting your DeployBot account, you need to complete three setups, such as Repository connection, environment creation, and server configuration. First, Connect a repository by pressing the first option.

This will take you to a repository setup tab. Here, I'll add the Gitea repo by pressing the Others option.

To get the Repository URL, move on to the Gitea site to log in to your account.

From the added repository in Gitea, copy the repository URL that you want to connect to in DeployBot.

Now, enter or paste the Gitea repository URL and select “Login and password” as an Authentication method. Here, your credentials will automatically appear. Now, add the “Title” and select the “Color label”.

Then, simply press the “Connect” button. This will connect the Gitea repo with DeployBot right away.
Step 3: Set Up an Environment on DeployBot
Click the second or “Create an environment” option in the third step.
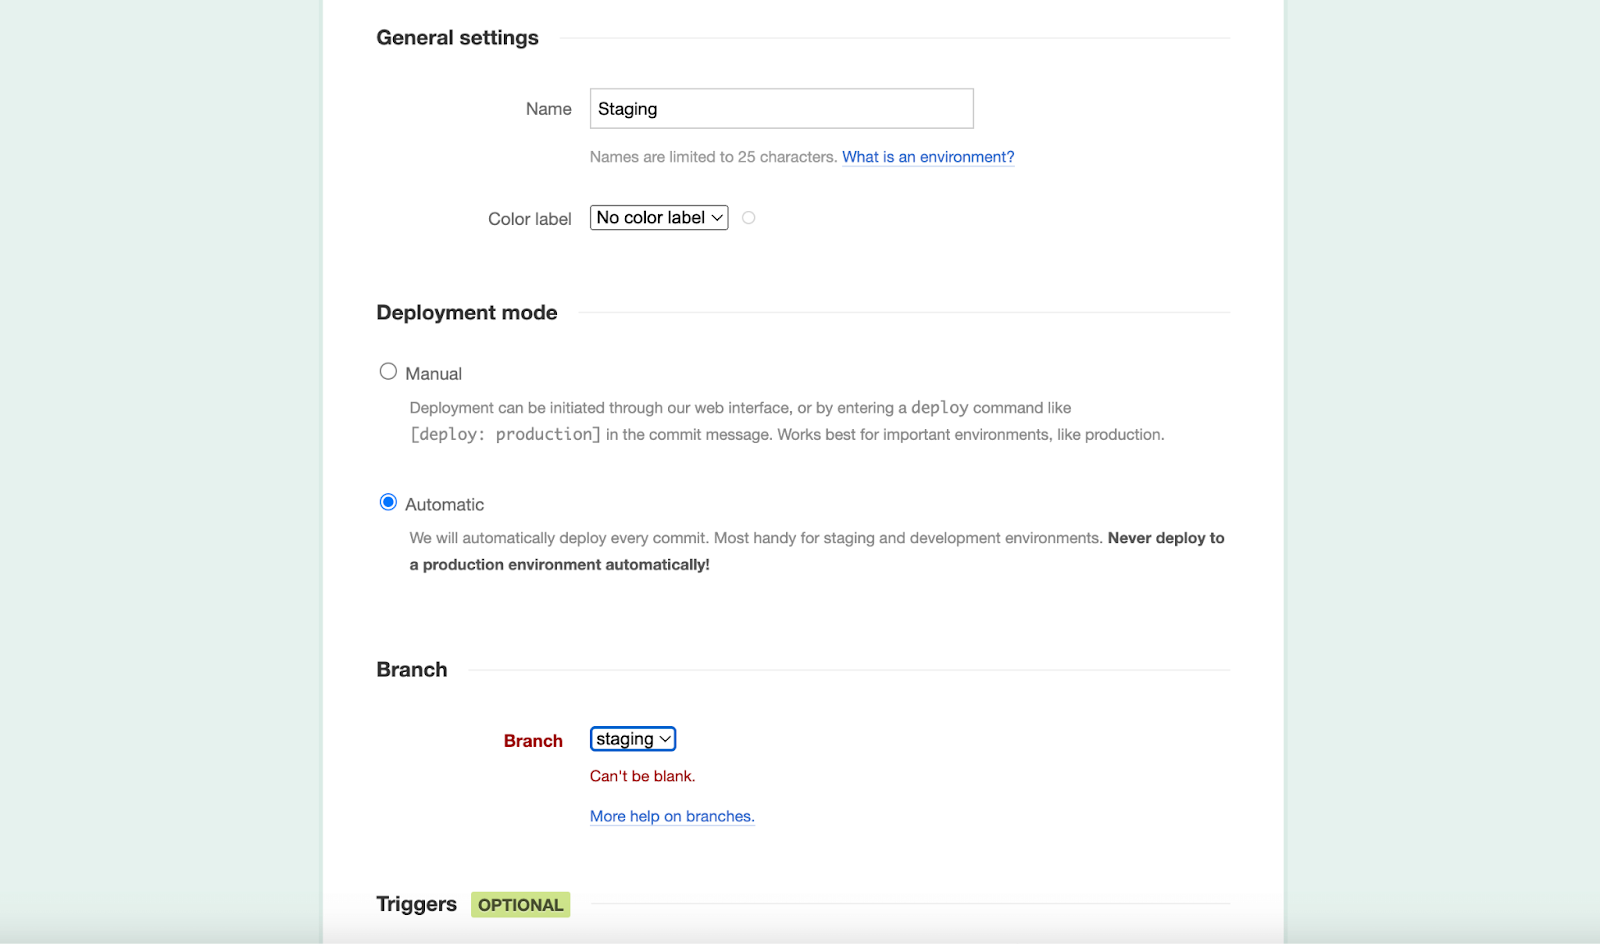
Now, give a name for your environment and choose a Color label for it. Then, you will get two Deployment modes such as:
- Manual: This deployment mode is required for a production environment where every deployment should be placed manually.
- Automatic: Automatic deployment is needed for staging and development environments because staging and development environments don't require in-person involvement.
Now, select the type of branch you have created in Gitea and hit the “Save” button.
Step 4: Add the Hostinger web hosting provider.
Lastly, you must add a server by navigating the Servers & Settings tab and pressing the “Add a server” button. Then, select SFTP as a Deployment option. This will take you to an SFTP server connection tab. To complete this configuration, you need to add a Name, Host, Post, Username, and Password. You will find all these on Hostinger.
To receive these details, log into your Hostinger account and navigate to the Home tab. Then, click the “Manage” button.

Now, navigate to Advanced >> SSH Access to deploy into Hostinger using the code deployment tool DeployBot.

Then, you need to enable the “SSH status”.

After enabling the SSH status, you will get to view SSH details, including IP, Port, Username, and Password. From here, you need to set a new password by pressing the “Change” option.

Now, complete the general settings by pasting all data you find from Hostinger. After filling out all the fields, hit the “Connect” button.

Then, insert the destination path and press the “Write test” button.
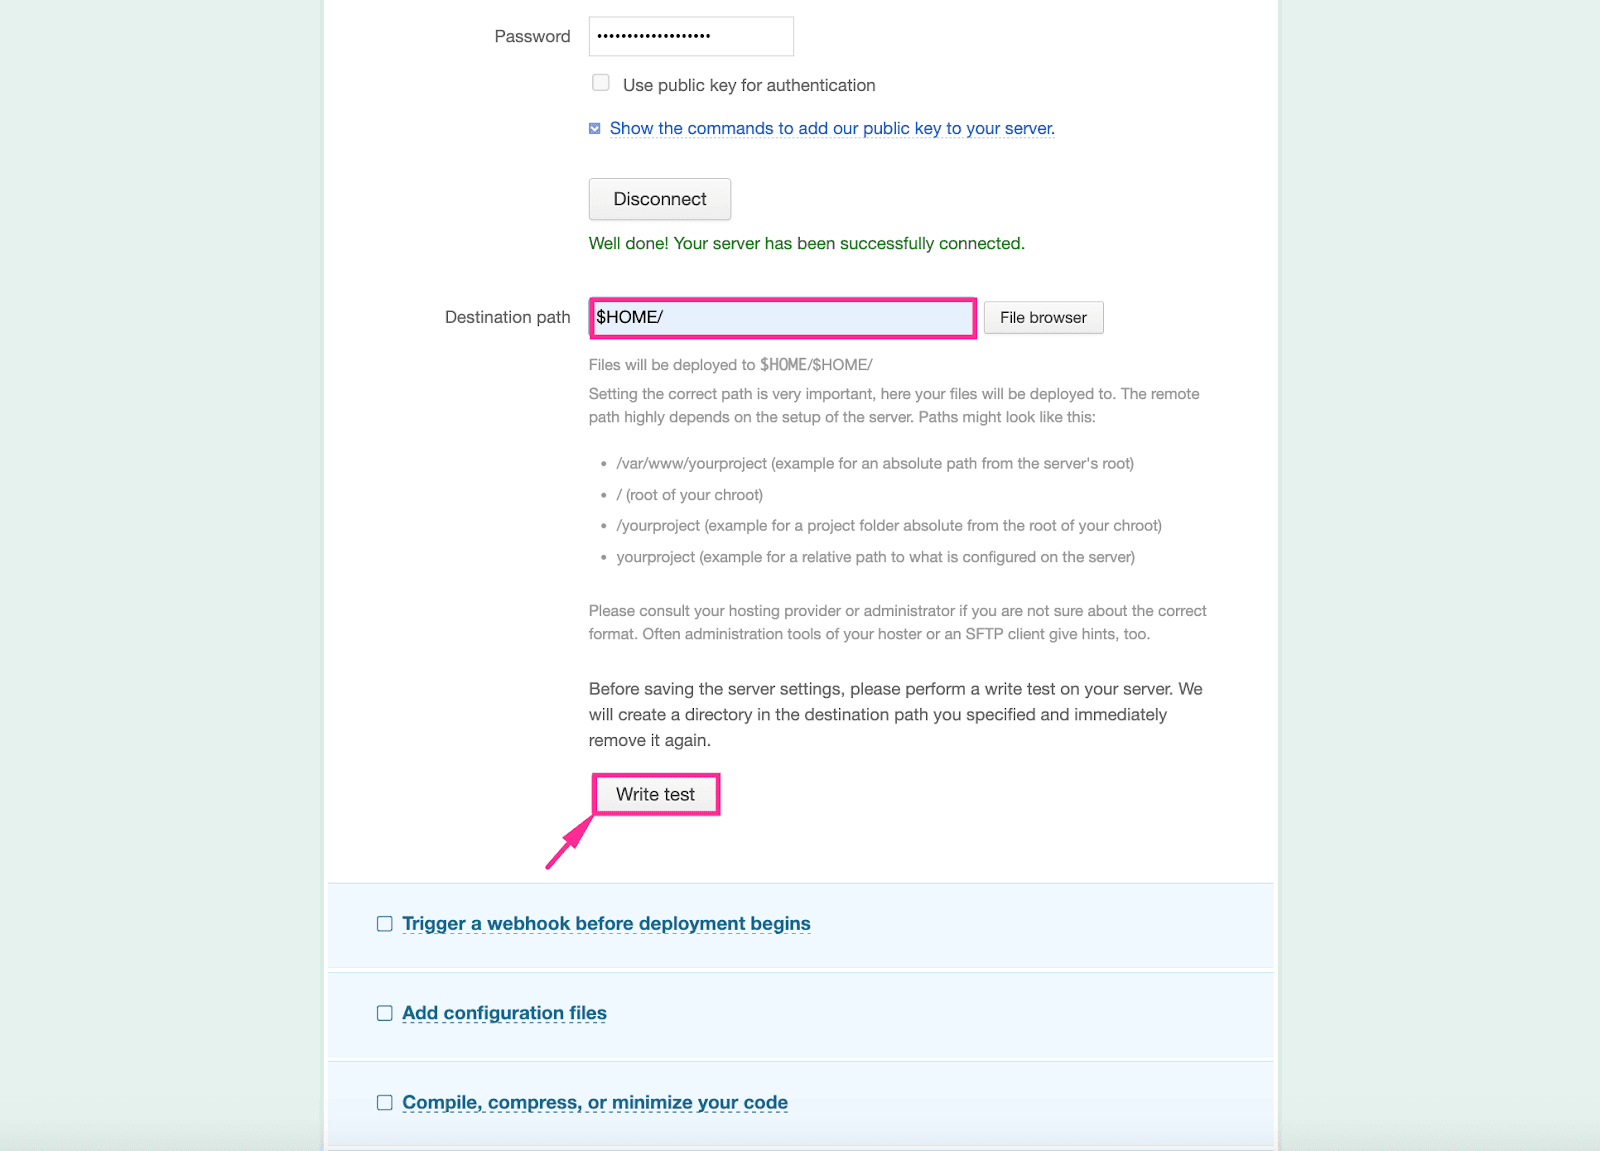
This will successfully connect your Hostinger server with DeployBot. Finally, hit the “Save” button to complete the final configuration of the server connection with DeployBot.

Thus, you will see Hostinger is connected with DeployBot on the “Servers & Settings” tab.

Integrate Your Favorite Hosting Server With DeployBot to Make Your Code Deployment a Breeze
As you have seen in this guide today, with the power of DeployBot and Hostinger at your fingertips, the once-daunting task of code deployment becomes a seamless and efficient process. Gone are the days of wrestling with convoluted workflows; DeployBot brings a streamlined, intuitive process to your development toolkit.
And this efficiency isn't limited to Hostinger alone, whether you're using EasyWP, Cloudways, WPEngine, WordPress.com, Flywheel, Kinsta, or Pagely. DeployBot ensures straightforward deployments across the board.
Let’s recap the standout qualities that make DeployBot indispensable. Key features such as collaborative coding support, simultaneous multi-server deployments, and automatic rollback capabilities make it a comprehensive tool tailored for both individual developers and team workflows.
Following the steps that I have provided, you can now gear up to effortlessly deploy your code to Hostinger through DeployBot. It’s truly that simple!
But not to mention, it is absolutely vital for you to keep continuous monitoring top of mind. While DeployBot removes many complexities, vigilant oversight allows you to identify and rectify any hiccups that might occur swiftly. A bit of proactive monitoring ensures your deployments remain consistently reliable and error-free.
With this integration, you’re primed to elevate your code deployment endeavours on Hostinger, leveraging the full spectrum of DeployBot’s features. Surely, combined with methodical observation, you can confidently navigate a smooth deployment journey.
The synergy between Hostinger’s dependable hosting and DeployBot’s dynamic automation framework culminates in an efficient, obstacle-free workflow. Bid farewell to the most troublesome aspects of code management and deployment.
Should you encounter any issues during your integration or deployment activities, DeployBot’s detailed logs are invaluable. They provide critical insights into any problems that arise, enabling swift and efficient troubleshooting for you and your team.
And remember, our support team stands ready to assist. Whether you need guidance with integration steps, help with configuration, or a deeper dive into any DeployBot functionality, our dedicated support professionals are always just a click away, committed to ensuring your success at every juncture.


