Ghost Deployment: Deploying Ghost Themes with DeployBot
We built DeployBot to help you spend more time focused on your most meaningful work. One of the things we’re really excited to see with our launch is different ways people put DeployBot to work.
Today, I’m sharing my personal experience using DeployBot for deploying and managing Ghost themes for my blog with a Git repository.
Ghost Theme on Git → DeployBot → DigitalOcean
As soon as I saw Ghost on Kickstarter, I was sold. The Ghost team launched the first version in September of 2013, and I’ve used Ghost software almost exclusively to host my personal website on DigitalOcean since their launch.
“Almost exclusively” because I hit a few snags trying to customize my Ghost theme. These snags weren’t related to the platform, but my lack of systems expertise. I spent hours muddling through adding FTP to my server. The entire time I was sure I was making a huge mistake.

There had to be a better way.
It’s been about a year since I joined Wildbit to help with our marketing, and in that time I’ve learned the basics of using Git. Armed with this knowledge I set out to create a simple workflow to manage Ghost themes for a blog hosted on DigitalOcean. Because I’m not a full-time developer or systems engineer, it took a bit of trial and error to make a Ghost DigitalOcean deployment process that's as smooth as possible.
To save you the hassle of trying to use FTP, I’m going to use DeployBot to manage the Ghost theme deployment process. DeployBot makes it easy to automate tedious steps when updating your Ghost themes, like manually moving your theme files to DigitalOcean, restarting services, and other post deployment tasks.
Here’s the workflow I used to get Ghost Deployment up and running:
- Setup a repository for themes
- Make changes to themes locally
- Connect DeployBot to themes repository
- Connect DeployBot to DigitalOcean account
- Setup a Ghost Droplet on DigitalOcean
- Connect DeployBot to Ghost Droplet
- Deploy Ghost themes to Ghost Droplet
- Restart Ghost after each deployment
To save you the time it took me to get this workflow up and running, I’ll lay out the specific steps you can take to get Ghost setup and get started managing your themes.
Step 1: Get your Ghost themes in version control
Let’s start by getting your themes set up in a Git repository. It might feel like overkill to use version control for your themes, but it will save you time and energy.
When I first started doing this, I kept the core directory in my repository. I didn’t realize what a colossal headache I was creating until it was too late. One day I wanted to redeploy all my files and the files in the core directory were from a pretty old version of Ghost. The deployment created a big mess that took me quite a bit of time to sort out.
If you want to try out this workflow, here’s a basic repo you can fork to help you avoid some of the mistakes I made. Once you have your own copy of this repository on GitHub or Bitbucket, create your local copy. You can host your repository where ever you like, but I’m recommending these providers because it’s easy to integrate them with DeployBot.
Drop your unzipped themes into the themes folder in this repository on your workstation and you’re ready to start making edits.
Step 2: Make changes to your Ghost themes
I’m not a theme wizard, so I only make small changes to my themes. I’m talking about changes you want to make to see how a theme fits your goals, like adding a Google Tag Manager script or putting my social profiles in place. The themes I’ve worked with all handled this kind of personalization a bit differently, and you’ll need to spend some time looking through files in each theme to determine where you need to make your edits.
If you’re more ambitious, you can dig in and build your own theme.
Once you’ve got all your changes ready, commit your changes to your Ghost theme repository. I use Tower to do this with a GUI, and you can use you’re favorite method to finish up this step. After you commit locally, push your changes to your remote repository.
Step 3: Connect DeployBot to your repository
Now that you’ve got your Ghost themes in version control, let’s start connecting everything to DeployBot. To get started you should connect DeployBot to your repository. If you don’t have an account, you can sign up for a DeployBot account here.
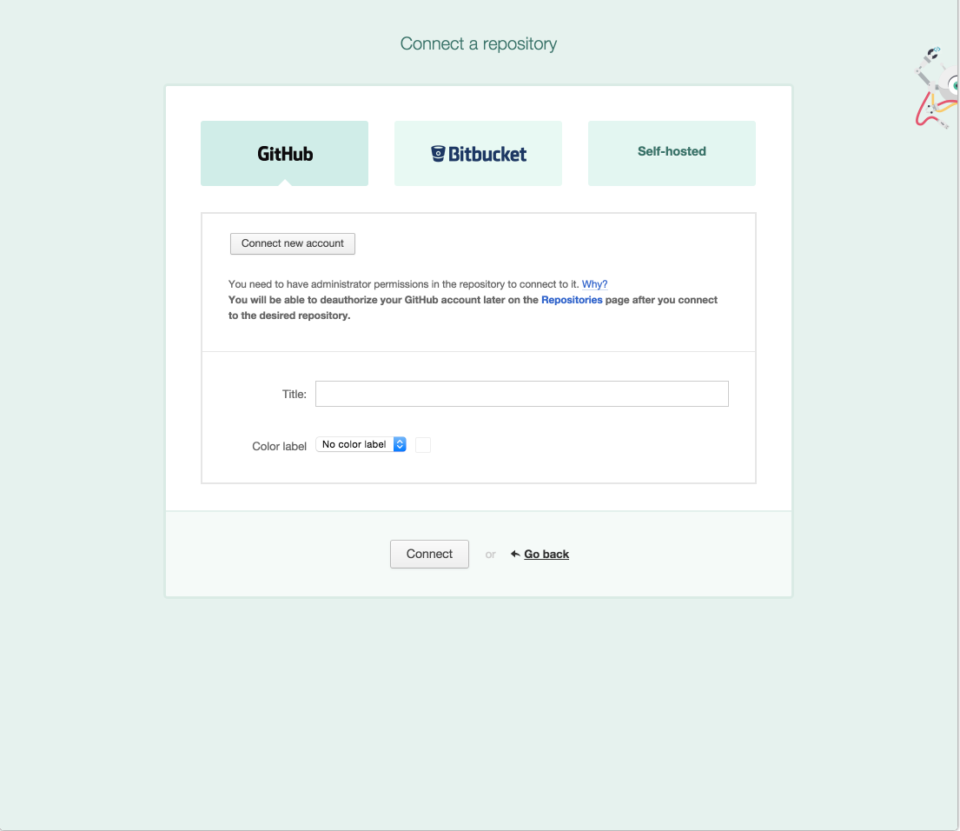
Once you’re logged in, you can connect DeployBot to your Git repository. If you’re using GitHub or Bitbucket, it’s as simple as logging in to your account and authorizing DeployBot with OAuth. Once you’re connected, select your Ghost theme repository back in DeployBot and hit the connect button.
Step 4: Connect DeployBot to your DigitalOcean account
Before we create your new Ghost Droplet, we need to connect DeployBot to DigitalOcean. This will add DeployBot’s SSH keys to your DigitalOcean account, which will make it really simple to connect your Droplet a little later in this workflow.
From the Dashboard in DeployBot, click on Settings.
You’ll see a list of DeployBot’s integration partners, and you should click on Connect next to DigitalOcean. Add a label for this connection, and click through to DigitalOcean’s API settings to create a Personal Access Token. Be sure to include write access with this token because DeployBot will be copying files from your repository to your Droplet.
Once you’ve created your token, copy it and paste it into the the Personal Access Token on DeployBot. Click Connect again, and you’re all set.
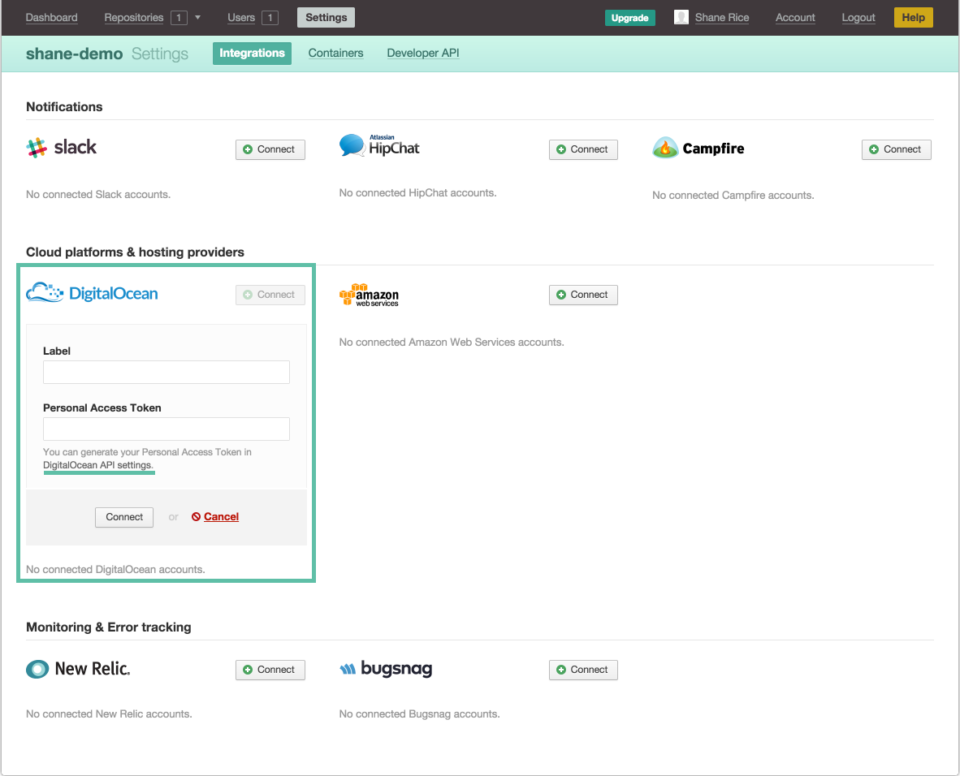
You should see a new SSH key with a label like "DeployBot [integration label you created]" in your Security settings in DigitalOcean.
Step 5: Setup Ghost Droplet on DigitalOcean
We’ve done a bit of prep work in DeployBot, and now it’s time to create your new Ghost droplet on DigitalOcean. This is where I host my blog, and they have a really handy Ghost application image. When you’re ready to fire up your own Ghost blog, there’s no better place to start than this excellent guide from Hannah Wolfe.
Important note: Make sure to add DeployBot’s SSH key to your new Ghost Droplet when you’re creating it. You’ll see it in your list of SSH keys with the label "DeployBot [integration label you created]". You should also add a SSH key from your workstation to your new Droplet. This will give you local CLI access and will make long term maintenance much easier. If you don’t have a SSH key setup for your workstation in your DigitalOcean account, you can use this guide to get started.
Step 6: Create an environment in DeployBot
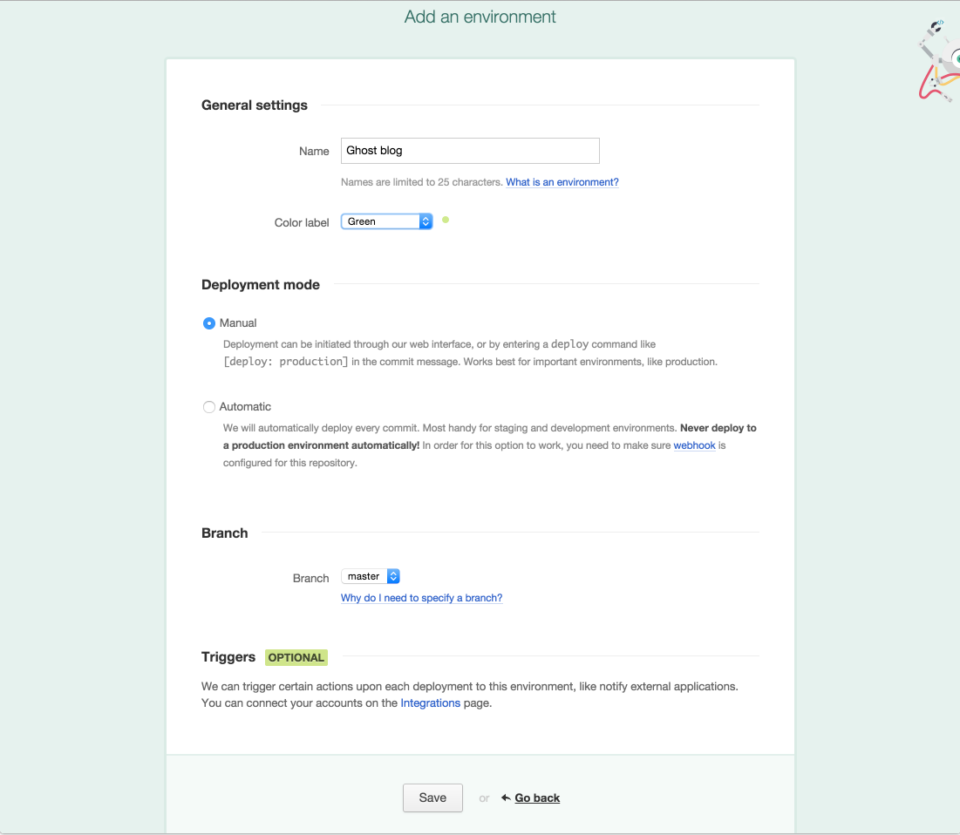
With your repository connected to DeployBot and your Ghost droplet created, now we need to create an environment in DeployBot. You can create multiple environments for a single repository, a couple of examples of how you could use this in a workflow include having separate dev/staging and production environments. For this example we’ll just create a single environment we’ll call “Ghost blog”. Choose whether you’d like to deploy automatically with each commit, or manually in the web interface.
When you’re ready, save your changes.
Step 7: Connect your Ghost Droplet to DeployBot
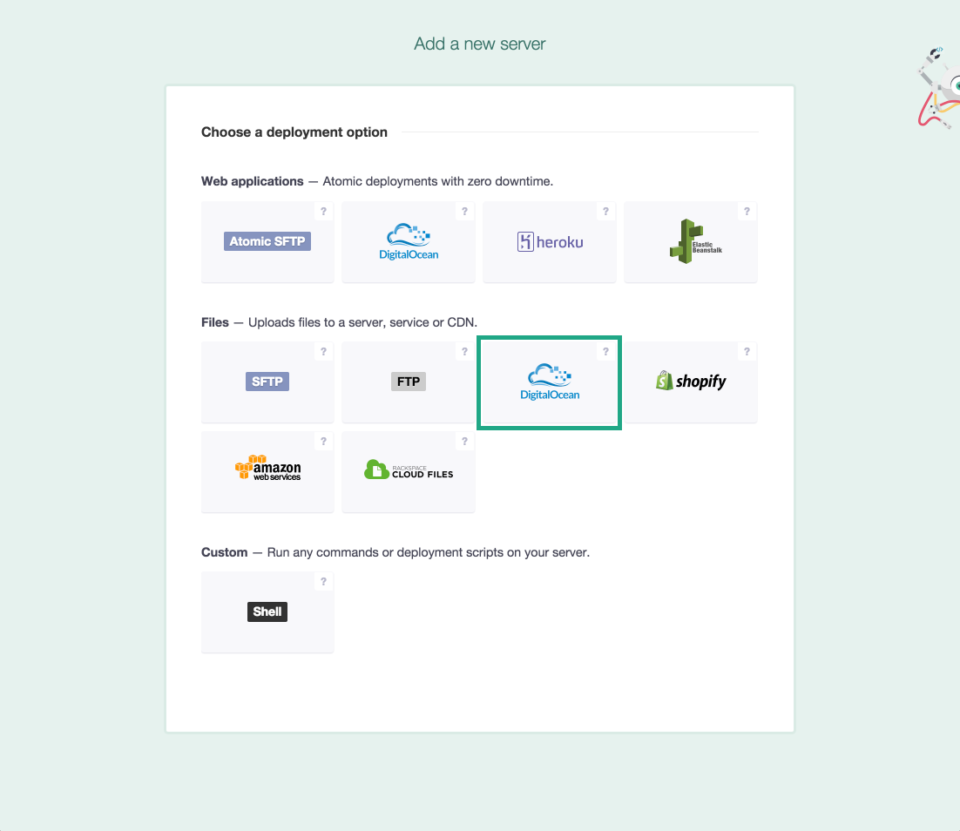
Now it’s time to add your new DigitalOcean Ghost Droplet as a server in DeployBot. After saving your environment, the next page shows you a list of server options. For this workflow you should select DigitalOcean in the Files section.
You’ll need to name this server, which is what you’ll see in your DeployBot environment for your Ghost Droplet. With a name in place you need to select your Ghost Droplet from the Droplet drop down. Once you’ve selected your Ghost Droplet, set the remote path for Deployments to /var/www/ghost/content. DeployBot will use the remote path you set to copy files from your repository to this directory on your Droplet.
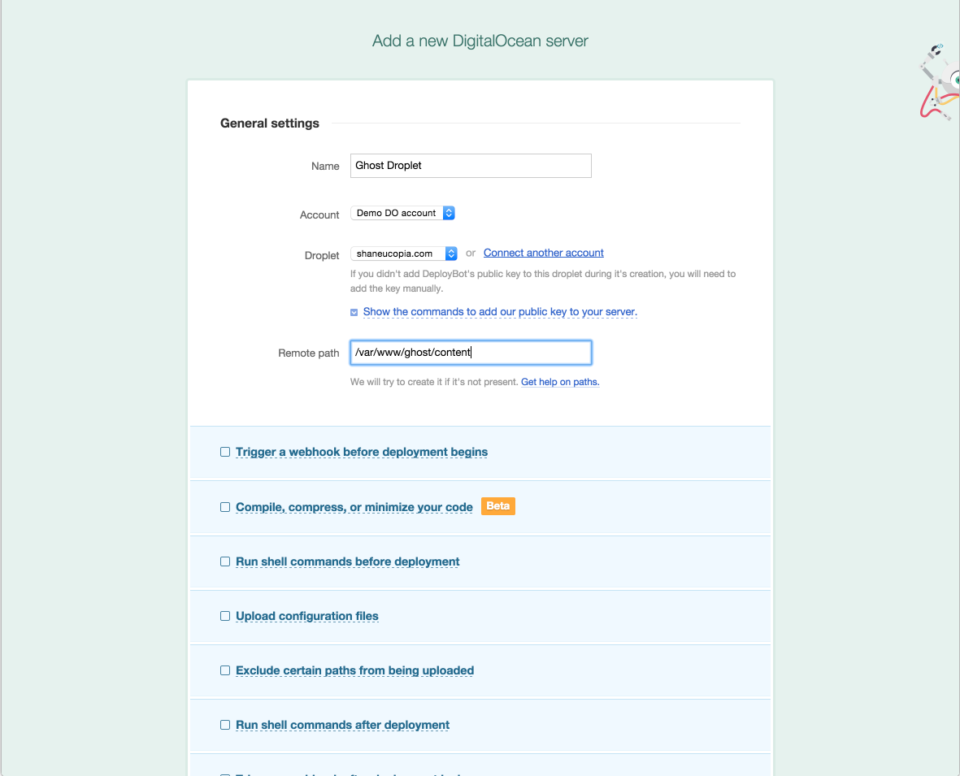
As you go down the list of options, you’ll want to select "Run shell commands after deployment" and enter service ghost restart.
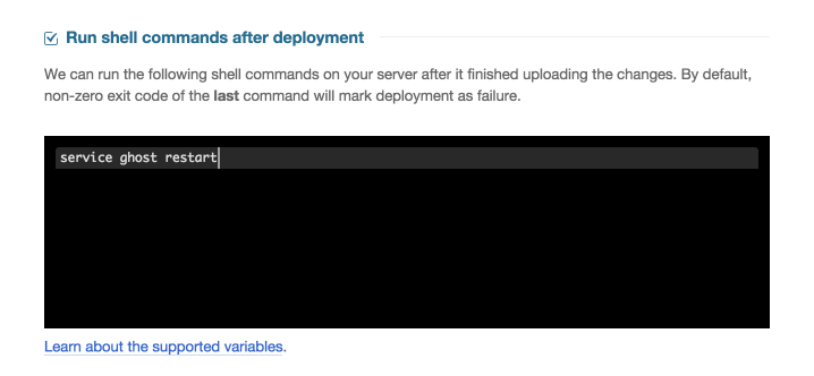
Save your changes. If you completed the DigitalOcean integration and added your SSH keys to your Ghost Droplet, the next screen you see should be the dashboard for the environment you created.
Step 8: Deploy Ghost theme changes
With everything setup you can click the Deploy button in DeployBot. This will start the process of copying your themes from your repository to your Droplet and restart Ghost so your themes show up in your admin area. If there are snags during deployment, DeployBot will log them and report any incidents to you.
Step 9: Log in to Ghost admin and set your theme
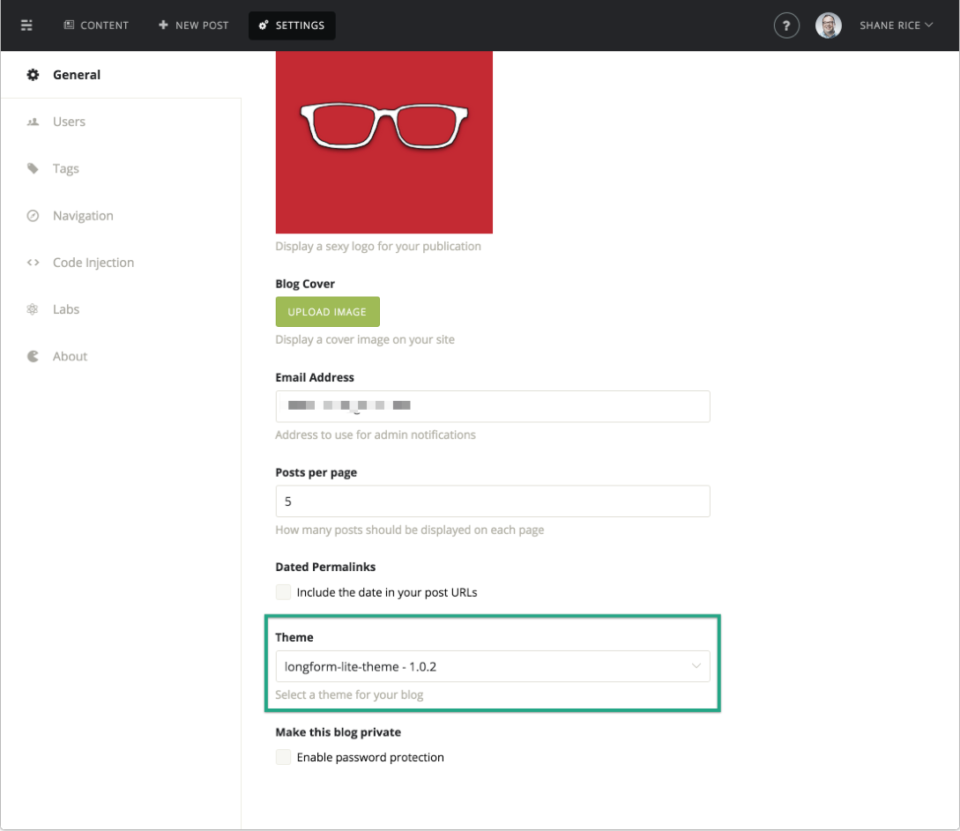
Login to your Ghost blog, navigate to the Settings area, and in the General option scroll to the bottom to change your theme. Scroll back up, hit save, and your new theme will be live on your blog.
More DeployBot workflow stories to tell
This workflow is pretty simple, but it makes managing my Ghost blog a ton easier. Over the next few weeks we’ll be featuring how DeployBot can help simplify other workflows. It would be really cool if we could include how you use DeployBot. If you’d like to be included, you can email support@deploybot.com or tell us about your workflow on this form.
If you just can’t wait to share your workflow, or you have questions about my workflow, hit us up in the comments.


