Deploy Google Web Starter Kit to DigitalOcean
Over the years I’ve built up enough HTML and CSS skills to make really basic changes on a page, but never really dug in the guts of a site and made it completely my own. Earlier this summer I found Web Starter Kit from Google, which is a boilerplate site that makes it easy to setup a local development environment.
Web Starter Kit has been a great way for me to learn, because I can see changes I'm making right away on my desktop. It's been fun to work on my local environment, but it took me some time to learn how to deploy my work to a server. Laying out how to deploy your work to a live server is the logical next step for people learning to use Google Starter Kit to code their own websites.
In this Google Web Starter Kit Deployment Guide, we're going to cover:
- setting up Web Starter Kit in a Git repository
- connecting DeployBot to your Web Starter Kit repository
- connecting DeployBot to a Droplet on DigitalOcean
- the specific settings you'll need to deploy your Web Starter Kit project
Fork Web Starter Kit on GitHub
For the purposes of this Web Starter Kit tutorial, we’ll get started by forking the Web Starter Kit (WSK) repository on GitHub. Since we’ll be using DeployBot a little later in this guide, having WSK in a repository will make it easy to move your WSK project to a live server.
I created a forked repository where I’ve updated the .gitignore file for later in the process, and you can grab it here. If you prefer to fork the original WSK project, you'll need to take care of updating this file on your own. Open the .gitignore and remove the ’dist’ folder on the second line.
Removing the 'dist' folder from your .gitignore file will make sure DeployBot copies this folder to your server, and allows DeployBot to grab the fresh contents of this folder each time it builds your WSK assets with Gulp.
Once you’ve forked the repository it’s time to clone, or checkout, the WSK repository to your workstation. Now you’ve got everything you need to get started making local changes to WSK.
Using Starter Kit to Develop Locally
Google has done a fantastic job documenting the WSK setup process. Since we've already covered one part of the process, copying the WSK repository to your workstation, I’ll cover the other key steps here.
With WSK on your workstation, make sure you have Node installed on your workstation by running node -v from your CLI. If you don't get a response from Node, go to nodejs.org, grab the latest version, and install it on your workstation.
Once you've verified Node is running, change directory into your local repository in your CLI and run the following scripts.
npm install
npm install gulp -g

gulp serve
That's it. You should have a window in your browser showing your local WSK project. There are a ton of ways you can hack away at Web Starter Kit. It’s really slick to make a change in your text editor, save it, go to your web browser, and see the change without having to reload.
When you’re ready to see your changes on a server, commit them to your repository. You can do this from your CLI or favorite Git client.
Connect DeployBot to your repository
Now you’ve got a repository with your work. It's time to connect your repository to DeployBot. If you don’t have an account, you can sign up for a DeployBot account here.
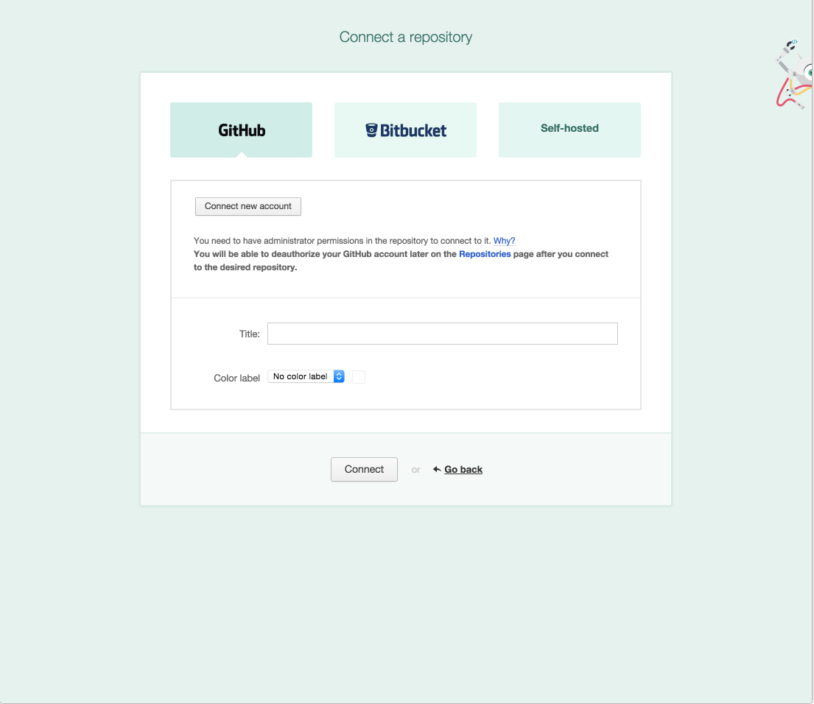
Once you're signed into DeployBot connect your repository. This is really straightforward for our workflow, because we’re using GitHub and DeployBot can connect directly to your GitHub account. If you’re new to DeployBot, you’ll be taken to github.com where you’ll sign in and be asked to authorize DeployBot. Once this step is complete, it’s back to DeployBot to select the GitHub repository you’d like to connect. Select your WSK repository from the dropdown, and hit save.
Connect DeployBot to DigitalOcean
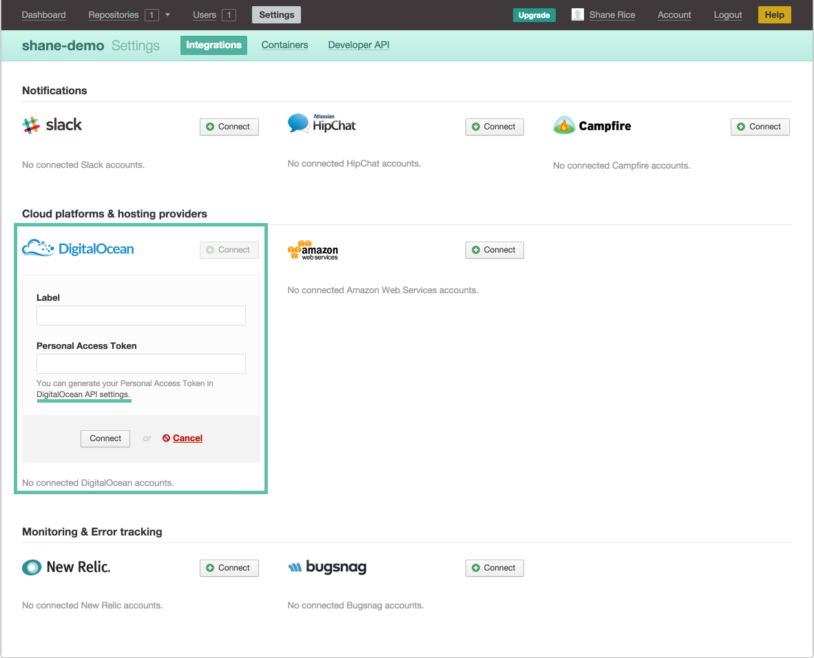
DeployBot has a nifty integration with DigitalOcean to connect your Droplets. You select the Droplet you want to use from a dropdown, and DeployBot handles all the default settings. Also, when you create new Droplets, you can add DeployBot's public SSH key with a single-click. This makes setting up new Droplets and deploying your work with DeployBot really straightforward and fast.
Click on Settings in the DeployBot navigation, and on the Integrations page click on Connect next to DigitalOcean. Provide a label for the account you're connecting, and clickthrough to the DigitalOcean API settings page to create your Personal Access Token. Once everything is in place, click Connect again to complete the process.
DeployBot's public SSH key will now be listed on your DigitalOcean security page.
If you haven’t added an SSH Key to your DigitalOcean account for your workstation you should do this now. It will make managing your Droplet from your CLI much easier, and gives you a more secure way to access your Droplet. Here’s a guide from DigitalOcean on how you can add an SSH Key.
Set up a DigitalOcean Droplet
Now that we've connected DeployBot to DigitalOcean, it's time to create a new Droplet to host your WSK project.
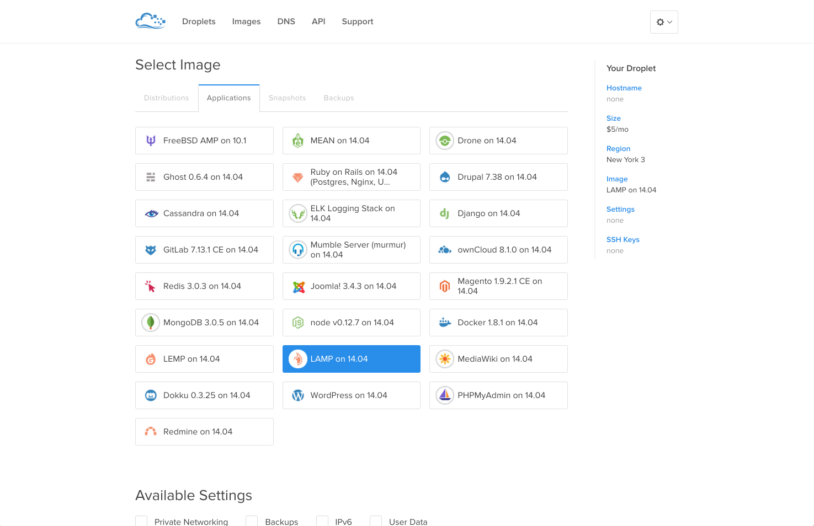
Log in to your DigitalOcean account. Give your new Droplet a hostname, select your plan, and region. When you hit the Select Image option, choose the “Applications” tab and look for LAMP in this list. To finish up this process add both DeployBot and your workstation's SSH keys to your Droplet, and click on Create Droplet.
Connect your Droplet to DeployBot
With your repository and DigitalOcean connected to DeployBot it’s time to create an environment and connect your Droplet to DeployBot.
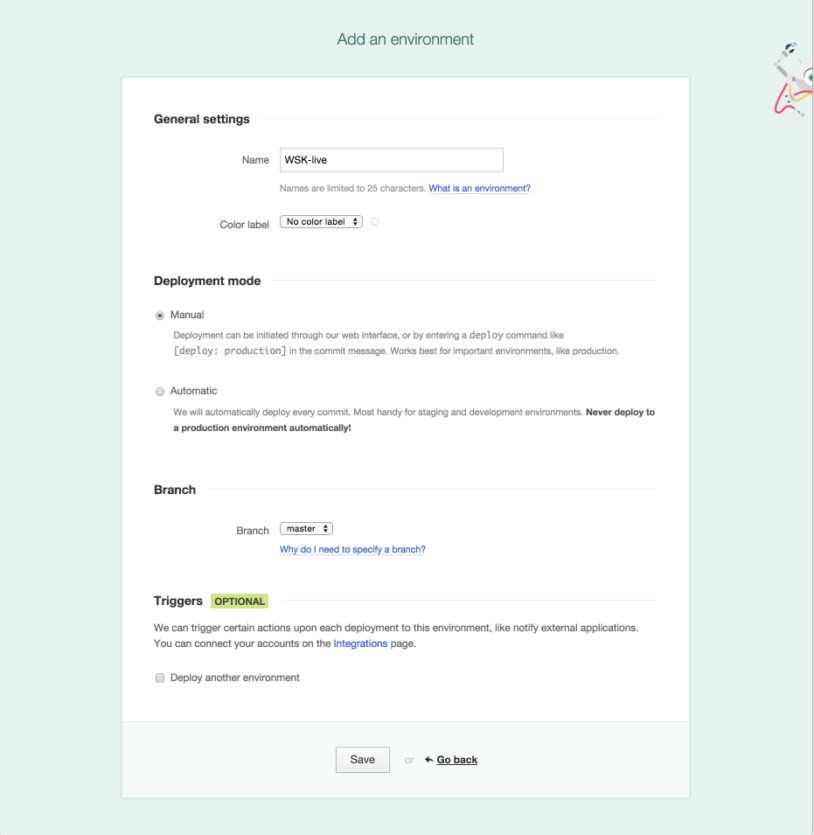
Environments are really important because they allow you to connect multiple servers together for a single deployment workflow. They also give you separate locations for staging, testing, and production servers. Additionally they allow you to chain together actions based on a ton of configuration options. For our workflow today, we’re just going to create a single environment. Let’s call it WSK-live.
You can choose to deploy automatically, but that’s really something that’s better for a staging or testing environment. For this workflow, let’s stick to manual deployments. Also, make sure you select 'master' in the branch selection dropdown. Once you’ve got everything in place hit save.
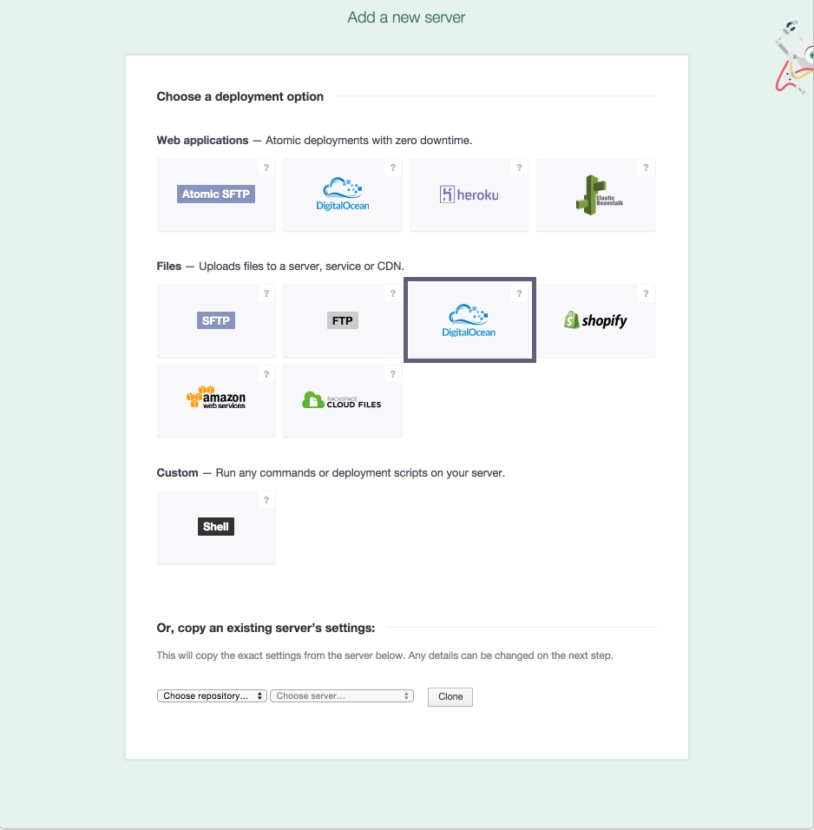
Now, let’s add a server. On this page you’ll look in the files section and select DigitalOcean.
You’ll need to name this server, let’s call it WSK-live. Select your WSK Droplet from the dropdown.
Once you’ve selected your WSK Droplet, set the Remote Path to:
/var/www/htmlAfter you’ve set the remote path, expand the Compile, compress, or minimize your code section. This is where you can tell DeployBot to run Gulp when deploying your most recent commit. You'll want to run Gulp, just like you did when you were setting up WSK on your workstation. To do that, enter:
gulpYour server setup page should look like this when you’ve finished these steps.
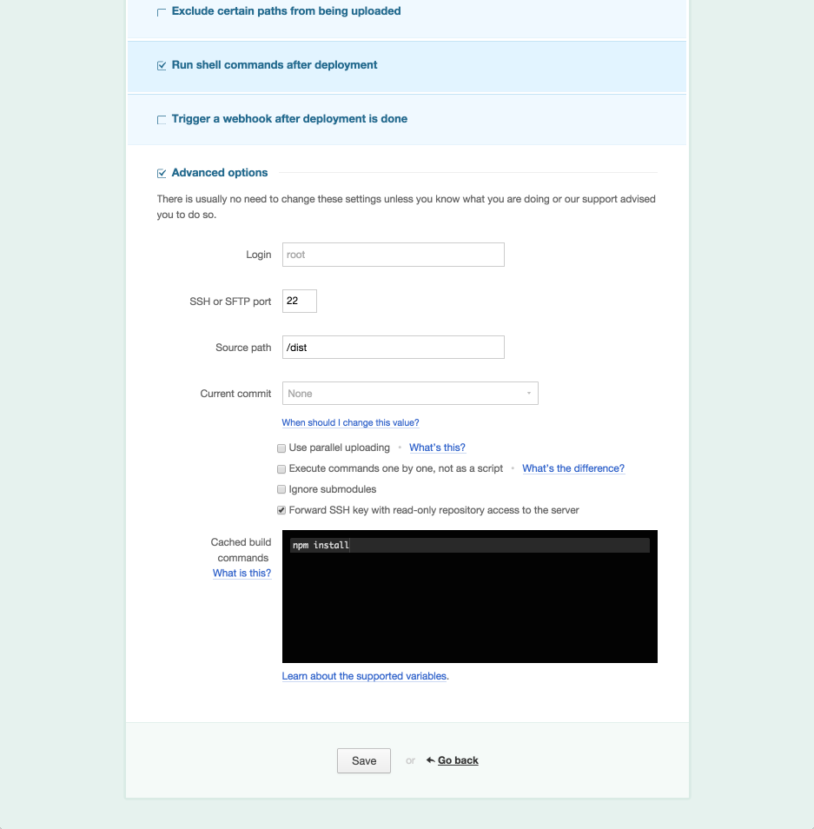
We’re almost done with this configuration, you just need to add a couple of things to the Advanced Options section.
First, we need to set the source path. This tells DeployBot to move the contents of the /dist folder from our build to the remote path we set earlier, /var/www/html, on our Digital Ocean droplet.
The final step you need to take care of is adding a command in the Cached build commands. This runs commands once, caches them, and rebuilds the cache when you update meta data about your app in a package.json or similar file. It makes building your assets or application much faster because DeployBot doesn’t need to download and unpack your dependencies every time it starts a build. Eugene talked about this a bit in his guide to building assets with Grunt/Gulp.
In this field add:
npm installOnce your server setup looks like this, click save.
Deploy your code
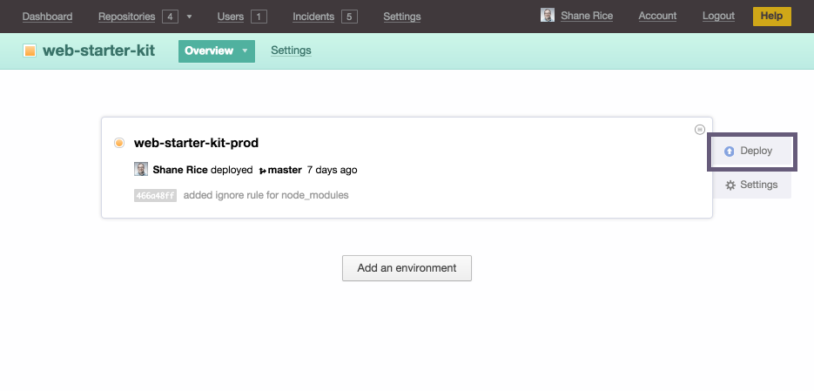
With your environment and server setup, now it’s time to let DeployBot work its magic. You can start a deployment from your DeployBot dashboard, or from within your WSK environment.
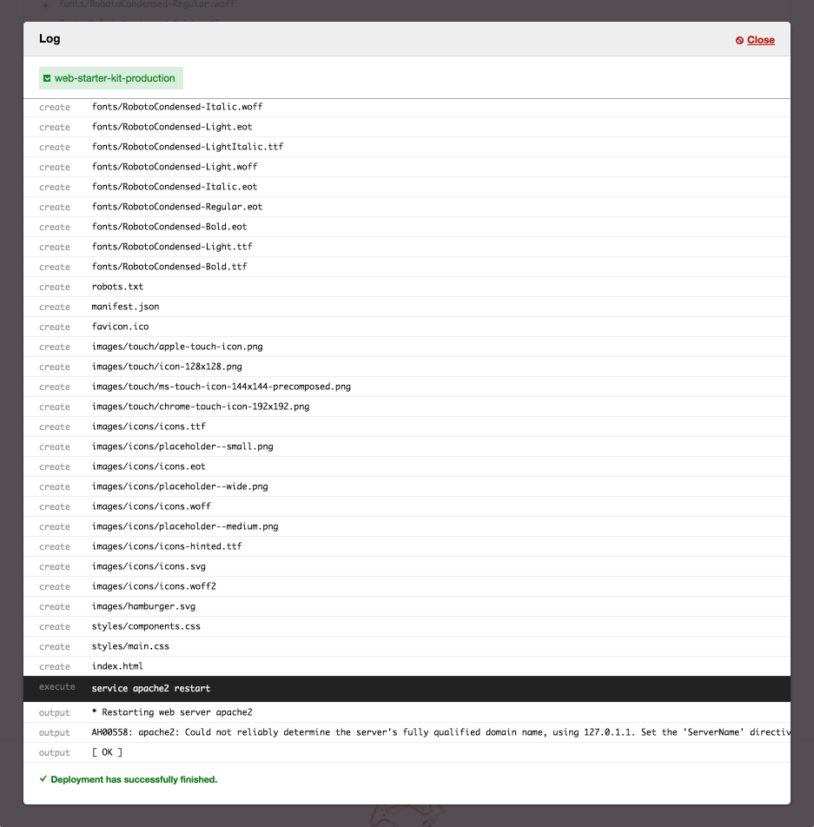
You can track DeployBot's progress by following along with the real-time log to see how your build and deployment are developing step-by-step.
Rinse and repeat
Once your Web Starter Kit deployment is successful, go to your Droplet’s domain or IP address and you'll see your project running on a server on the web. DeployBot makes it easy to work on your WSK project locally, commit your changes, and deploy them to share with the world.
Did you find this workflow useful? Have any tips to share with other DeployBot users on managing Google Web Starter Kit projects? We’d love it if you shared your site and experience in the comments.

