How to Deploy into Cloudways Using DeployBot
Today's fast-paced software development industry has led teams worldwide to agree on one thing: the key to smoother workflows lies in automated deployments, leaving the old manual ways in the dust.
Anyone who's been through the headache of manual deployments knows the pain – the errors, the energy drain on team members – it's a real struggle. And if you are a DeployBot user, then you must already know that it is one of the best software deployment tools that enables you to connect your code repositories to your desired servers easily.
When it comes to managed cloud hosting platforms, we all know the talk about being a high-quality solution that provides an automated deployment repository. But there's one hosting provider that doesn't just talk the talk – it walks the walk. Meet Cloudways, a platform that not only promises but actually delivers on the front of high-quality solutions for WordPress websites thanks to its seamless automated deployment features.
In this guide, we will walk you through the simple process of deploying your code on a Cloudways server using DeployBot for your WordPress site. So, let’s dive right in.
If you’ve read this far, you’re probably a DeployBot user and familiar with version control systems, CI/CD, and other related topics. If not, we’ve compiled several beginner’s guides: Laravel, Digital Ocean, Ruby on Rails, Docker, Craft CMS, Ghost CMS, Google Web Starter Kit, Grunt or Gulp, Slack, Python, Heroku and many more.
Step-By-Step Guide to Deploying Into Cloudways Using Deploybot
Steps 1 to 4 are for new users who don’t have a DeployBot account, a repository, or a server added to it yet. If you already have a DeployBot account and have GitHub connected to create an environment for your website, you may directly skip to Step 4.
Step 1: Create a DeployBot account
You can create an account for free, which will be used for a single repository.
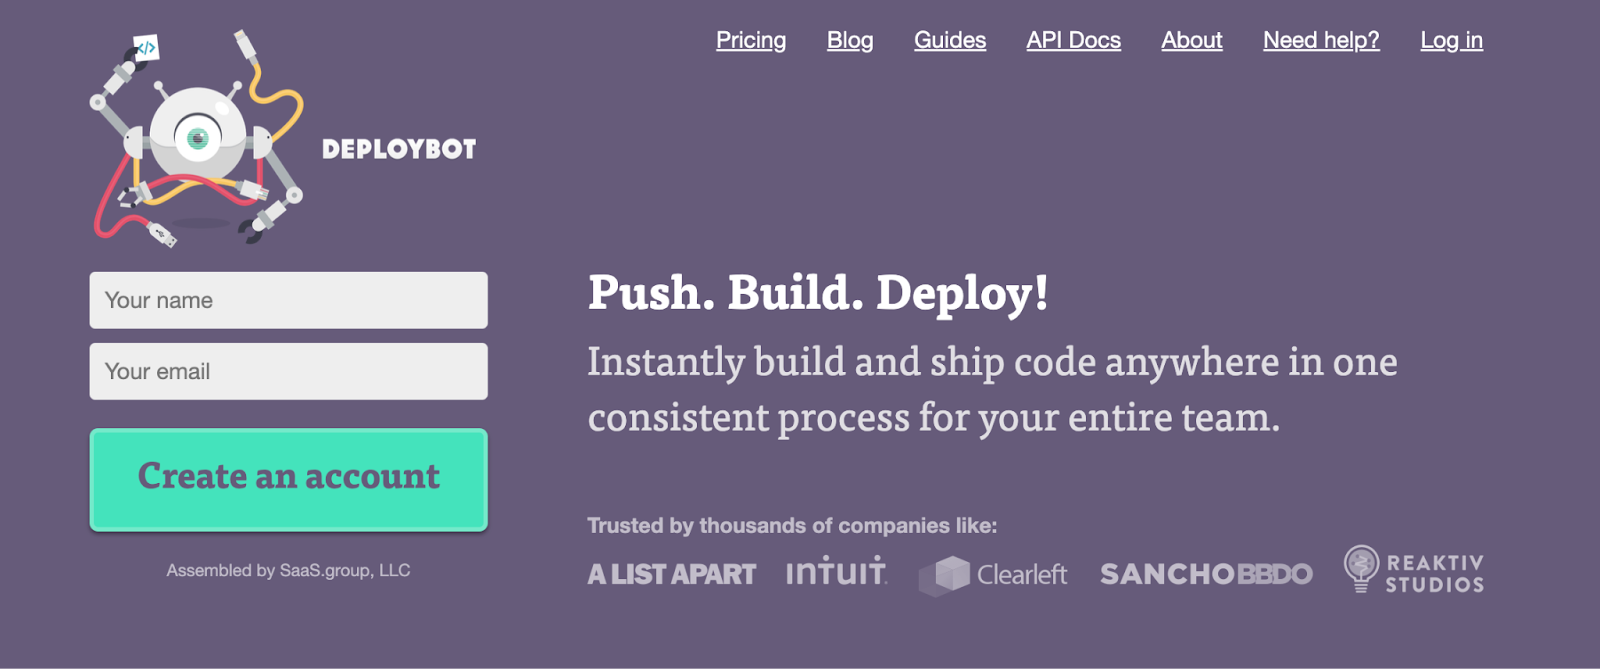
Here is a step-by-step tutorial on how to register at DeployBot based on the image:
- Enter Your Name: Click on the text field under "Your name" and type in your full name.
- Enter Your Email: Click on the text field under "Your email" and type in your valid email address. This is likely where you'll receive confirmation of your registration or any follow-up communication.
- Create an Account: After filling in your details, click on the "Create an account" button to proceed.
Step 2: Connect a repository
Choose connect a repository to connect the repo that you want to be auto-deployed to your Cloudways server.
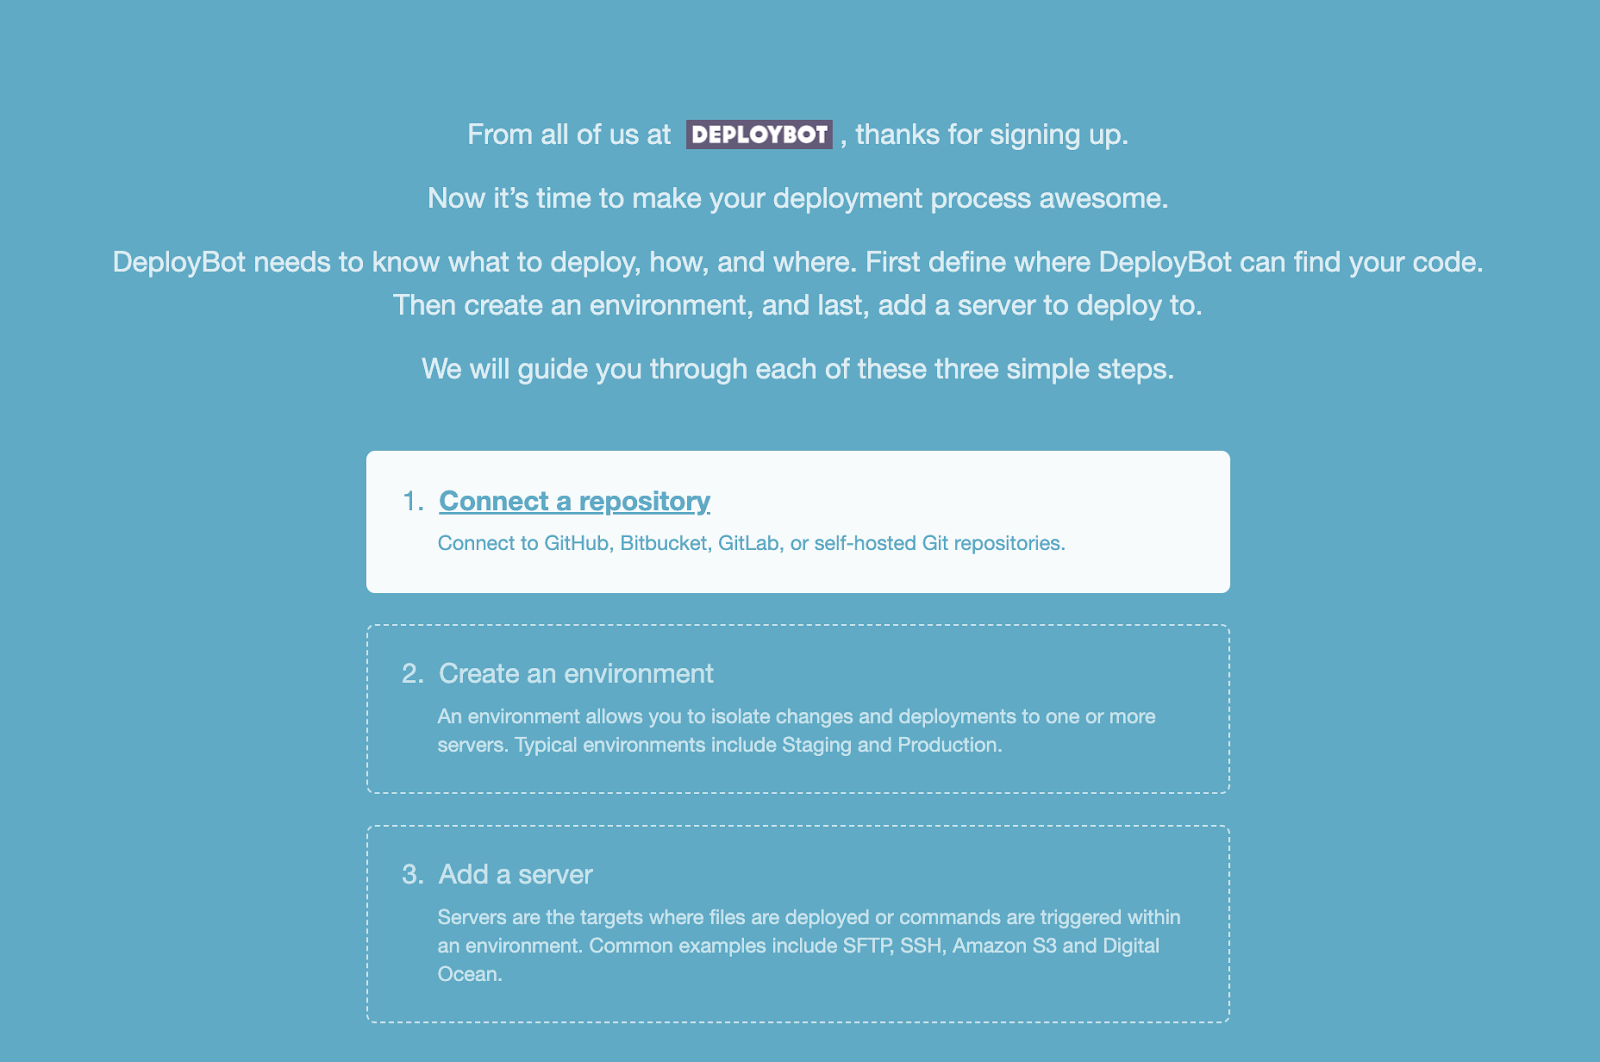
- Connect a repository: This step involves linking DeployBot to a code repository. It mentions the ability to connect to popular services such as GitHub, Bitbucket, GitLab, or self-hosted Git repositories.
- Create an environment: This step is for setting up an environment within DeployBot. An environment is where you can manage deployments and isolate changes to specific servers. Typical examples given are Staging and Production environments.
- Add a server: The final step is to add a server where the files will be deployed or commands will be executed.
Just to be clear, the DeployBot tool supports GitHub, BitBucket & GitLab out of the box, but you can also connect other repositories.

- Select GitHub: Start by clicking on the GitHub icon. This is usually the first step in integrating your GitHub account with DeployBot.
- Connect New Account: There's a button or link labeled "Connect new account," which you would click to initiate the connection process.
- Permissions Notice: The text on the page notes that you need to have administrator permissions in the repository to connect it to DeployBot. This means you should ensure that you are logged in to a GitHub account that has the necessary permissions.
- Repository Selection: After clicking to connect a new account, you will be prompted to log in to your GitHub account (if not already logged in) and then select which repositories you want to grant DeployBot access to.
- Finalize Connection: After selecting the repositories and granting permissions, the integration between GitHub and DeployBot will be completed, and you can begin using DeployBot to manage deployments for your GitHub projects.
After connecting, GitHub will ask for permission to provide authorization to DeployBot. Allow
authorization to go ahead and get started.

After the authorization process is done, you’ll be redirected to DeployBot.

After the connection is completed, you’ll be able to choose the repo that you want to be deployed on push. For example, I’ve chosen the “appsero-demo-plugin” repo. Whenever I push something new to this repo, I want this to be pushed on the Cloudways server as well. 
Step 3: Create an environment
After the first step, you‘ll be asked to choose the environment. Click “Create an environment”

In the next step, you’ll be able to set how you want to set up the deployment

Under "Deployment mode," there are two options: "Manual" and "Automatic." Manual deployment requires a user-initiated action, while automatic deployment will deploy every commit made to the repository.
Note that automatic deployment is handy for staging and development environments but should never be used for production environments automatically.
From the "Branch" section, you can select which branch you would like to deploy.

For example, if you have a branch “Staging” on your Git repo and you want that only when you push to the “Staging” branch - then the automatic deployment would work -- you can set it up from here.
Then, you’ll need to add your server (where you want the Push to Deploy to take place). For example, we want to add the Cloudways server here.
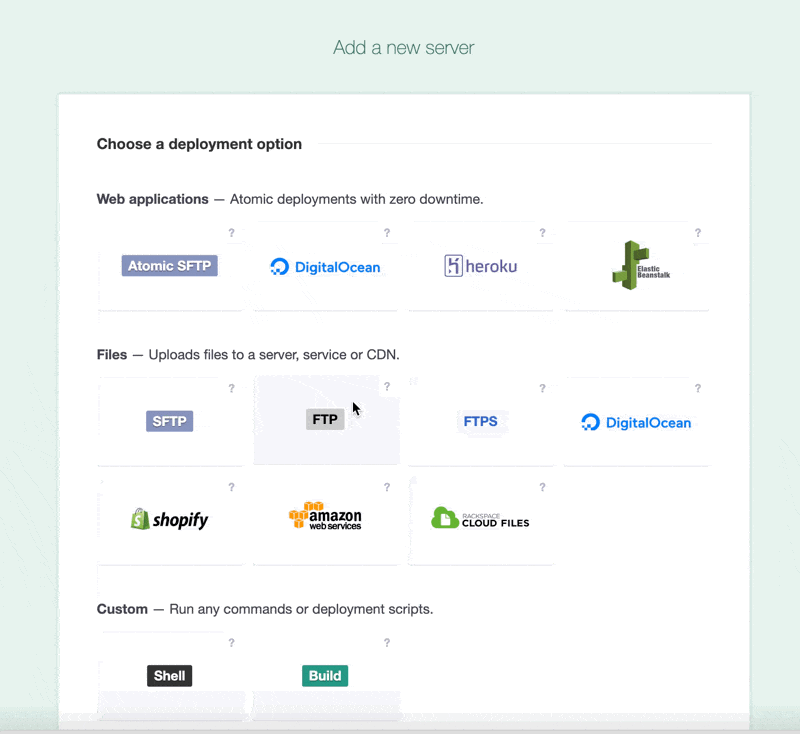
Step 4: Adding a server to deploy into Cloudways
In DeployBot settings, go ahead into “Servers & Settings” and click “Add a Server” to add a new server by choosing from the deployment option.
With DeployBot, you can deploy your Git repository to Cloudways via SFTP deployments.
You’ll need Cloudways' server credentials to enable SFTP access from DeployBot.
You can easily get the login credentials from the Master Credentials section inside the Cloudways Server Console.

Copy and paste credentials from Cloudways to DeployBot settings
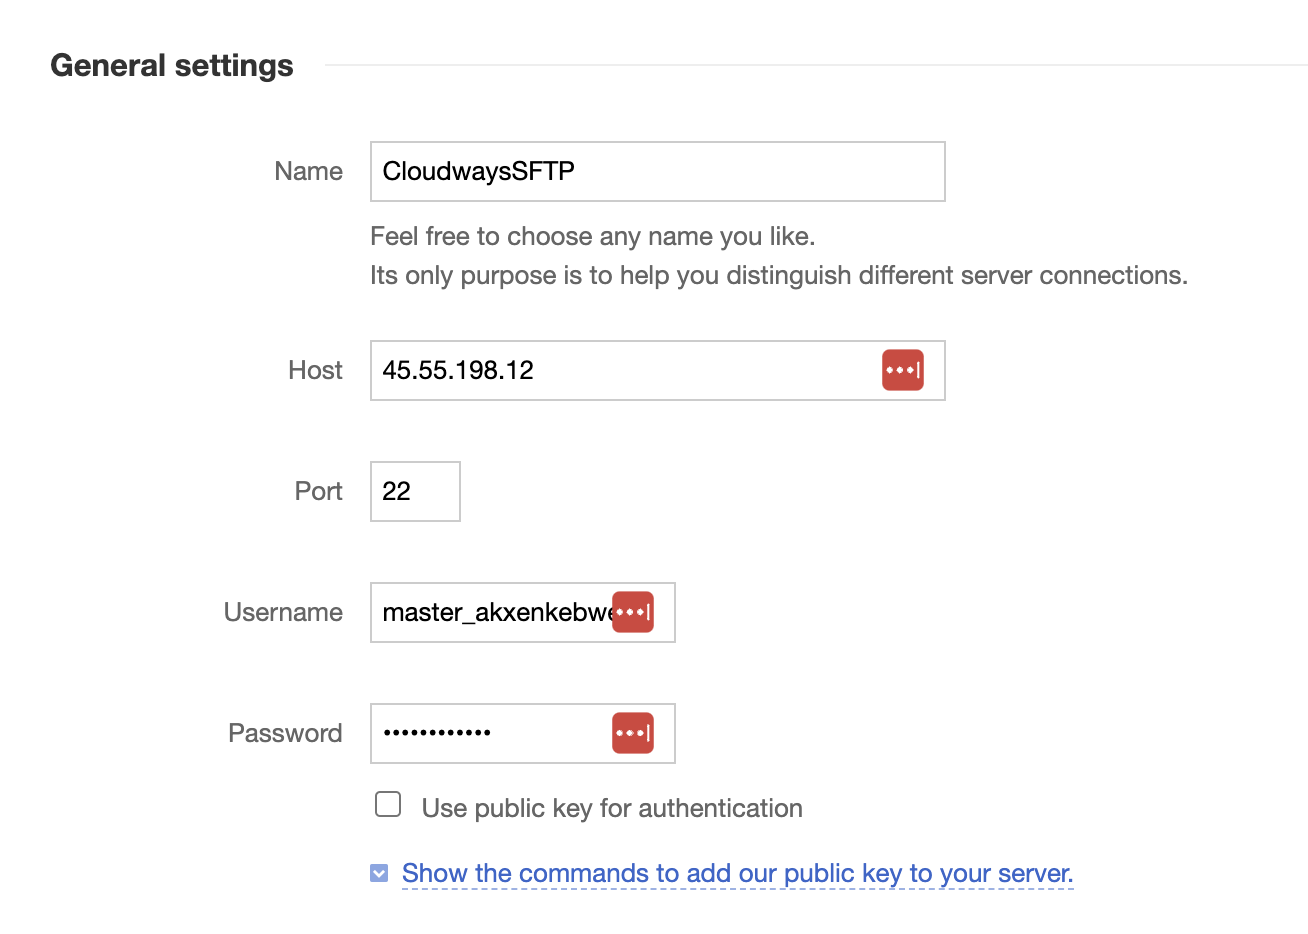
You’ll also need the destination path 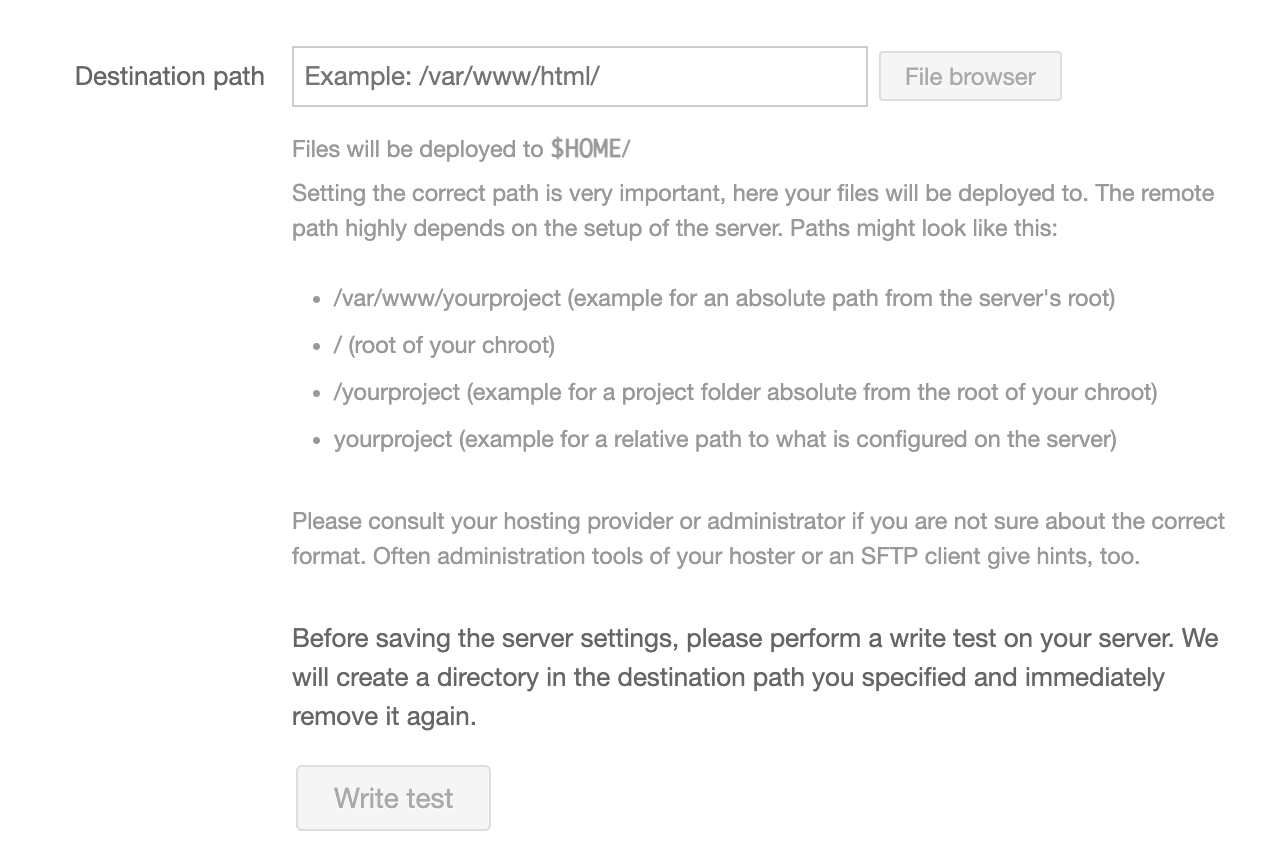
Cloudways installs all WordPress instances under /home/master/applications/ directory. You can find
your exact directory name by going into Application Settings.

In this case, my WordPress path is /home/master/applications/xbjfzsmnft/public_html/
Keep in mind that Cloudways offers two types of credentials: Master credentials and Application credentials. Master credentials come with SSH access enabled by default, but in order to function, the Application credentials need to be granted access to the SSH Terminal of Cloudways.
If you are using the team members' functionality or working as a team member already, then you would require the website owner to grant you SSH access.
Step 5: Deploy to test the connection
After entering all the info correctly - you can verify if everything is working correctly by testing the connection between Cloudways and Deploybot.

If all is working properly for you after making all the necessary settings, then go ahead and save the changes.

After that, a connection will be established, and any new changes to the selected repo will automatically deployed in the selected path you had chosen above.

Once the connection is successfully established, you are all set to deploy into Cloudways from the dashboard.
Click ‘Start Deployment’ on the next screen to start deployment.

In case you are wondering, you even have the option to deploy manually through DeployBot's dashboard.

Additionally, once deployed, you can also revert to a previous commit if needed.

Make the Most of Your Code Deployment Process by Integrating Deploybot With Cloudways
If you follow these steps correctly, you can deploy your WordPress website to Cloudways using DeployBot in an automated manner, ensuring a smooth transition to the live environment.
As mentioned earlier, you can also manually trigger deployments by clicking on "Deploy" in your DeployBot project dashboard. When you do so, the latest code will be fetched from your selected repository branch and securely transferred to your Cloudways site via SFTP.
In order to ensure a successful deployment, always keep an eye on the progress and view the logs in the DeployBot dashboard. After you've deployed your WordPress website, test it to ensure it works in the live Cloudways environment.
Feel free to contact our dedicated support team if you need any additional assistance with integrating DeployBot with your Cloudways server.


