How to Deploy into Kinsta Using DeployBot
As a developer, the stakes are high when it comes to deploying code changes to production websites. One small misstep during the deployment process can lead to downtime, data loss, or worse, angry clients demanding to know why their site is broken.
But let's be real: manually pushing code updates is a delicate art filled with headaches. From misconfigured build steps to sloppy Git commands, the opportunities for human error are endless. And let's not forget having to SSH into servers, pull code, flush caches, and restart services in some archaic ritual that arguably qualifies as tech hazing.
That's where hosting solutions like Kinsta enter the picture. Specializing in managed WordPress hosting, Kinsta provides a premium platform with seamless scalability, top-notch security, and hands-off infrastructure management. No more mind-numbing server admin work—just sleek hosting tuned for WordPress performance.
But even with a rockstar hosting provider like Kinsta, you're still left with the pains of manually deploying your latest code charges and praying nothing catches fire in the process. That's when savvy developers turn to deployment automation tools like DeployBot.
Integrating DeployBot with Kinsta empowers you to push code updates with zero drama and zero "works on my machine" nightmares. With just a few clicks, DeployBot automatically pulls the latest commits, runs your build steps, syncs to the Kinsta environment, and prompts you to bask in a perfect deployment. No fuss, no server hazing required.
In this guide, I'll walk through setting up the DeployBot and Kinsta integration to simplify and streamline your WordPress deployments. You can finally say goodbye to deployment anxiety and embrace a silky, smooth workflow tailored for productivity. Your code changes will glide effortlessly from the repository to the live site so that you can spend more time building cool stuff and less time wrestling with infrastructure gremlins.
But before I demonstrate to you the steps of deploying into Kinsta using DeployBot, let's briefly find out the key attributes of both DeployBot and Kinsta.
Benefits of Deploying Code With DeployBot
DeployBot is a powerful code deployment tool that streamlines the process of shipping code changes to your sites, eliminating the hassles and risks of manual deployments.
Here are the key benefits it offers:
Effortless Multi-Environment Deployments
- It allows you to simultaneously deploy code changes to one or multiple servers with just a single click.
- It supports both manual and automatic deployment workflows for your production, staging, and development environments.
Zero Downtime with Atomic Deployments
- It ensures your deployments are atomic, meaning code changes are deployed as a single, consistent unit.
- If any issues occur during the deployment process, DeployBot automatically rolls back the changes, preventing partial updates that can cause errors and downtime.
Instant Rollback for Problematic Releases
- In case a deployment introduces bugs or issues, DeployBot provides an instant rollback option, allowing you to revert to the previous working version of your codebase quickly.
Automated Notifications and Integrations
- It can send deployment notifications to various platforms like Slack, New Relic, BugSnag, and more, keeping your team informed about the deployment status.
- It also integrates with popular tools and services, enabling seamless collaboration and visibility across your development workflow.
Streamlined Deployment Process
- With it, you no longer need to track, upload, or manage files during deployments manually.
- It eliminates the need to access servers directly, reducing the risk of human error and simplifying the deployment process.
Efficient Team and Client Management
- It facilitates managing permissions for your dynamic teams and clients, ensuring secure and controlled access to deployment processes.
More essentially, by leveraging DeployBot, you can streamline your code deployments, minimize downtime risks, and increase collaboration and visibility throughout the development lifecycle. It empowers developers to focus on writing code while ensuring a smooth and reliable deployment experience.
Why Choose Kinsta As Your Hosting Provider/Server to Deploy With DeployBot
Choosing Kinsta as your hosting provider can be a great decision for several reasons. Here are some key factors that make it stand out:
- Managed WordPress Hosting: It is a specialized managed WordPress hosting provider, which means its platform is optimized specifically for WordPress websites. This ensures optimal performance, security, and hassle-free management of your WordPress sites.
- Scalable Infrastructure: Its hosting architecture is built on the Google Cloud Platform, allowing for seamless scalability as your website's traffic grows. You can easily scale resources up or down on-demand, ensuring your site can handle traffic spikes without any performance issues.
- Top-Notch Performance: Its hosting environment is designed for blazing-fast page load times. They use advanced caching mechanisms, content delivery networks (CDNs), and other performance optimization techniques to ensure your WordPress site loads quickly for visitors worldwide.
- Robust Security: It takes security seriously, implementing multiple layers of protection to safeguard your website from threats. This includes automatic updates, uptime monitoring, DDoS protection, hardware firewalls, and more, giving you peace of mind that your site is secure.
- Hands-Off Management: As a managed hosting provider, it takes care of all the backend tasks, such as software updates, daily backups, server-level caching, and more. This frees up your time and resources, allowing you to focus on your core business instead of worrying about server maintenance.
- Expert Support: It offers 24/7 expert support from WordPress professionals. Their knowledgeable support team is always available to assist you with any issues or inquiries, ensuring your website runs smoothly and efficiently.
- Developer-Friendly: Its platform is designed with developers in mind, offering features like Git integration, SSH access, and robust staging environments, making it easier to develop and deploy WordPress websites.
- Transparent Pricing: Its pricing is straightforward and transparent, with plans based on visitor counts rather than server resources. This makes it easier to predict and manage your hosting costs as your website grows.
To sum it up, by choosing Kinsta, you benefit from a reliable, high-performance, and secure hosting environment tailored specifically for WordPress, backed by excellent support and developer-friendly tools. Additionally, when deploying it with DeployBot, this combination ensures a seamless hosting, server, and code deployment experience and enables you to focus on growing your online presence.
Step-by-step Guide to Deploying into Kinsta Using DeployBot
Now that you know the perks of deploying into Kinsta using DeployBot, let’s explore the complete process. From DeployBot account creation to server connection, you will be guided through all the steps below.
Note: If you're a beginner, then start following from step 1. Otherwise, skip to step 4 if you have experience deploying into other servers using DeployBot.
So, let's jump right in with the steps.
Step 1: Register to Create a DeployBot Account.
Before configuring the setup to deploy your site on Kinsta, you must sign up DeployBot to create an account. Visit DeployBot and register by filling out the “Your Name” and “Your Email” fields.
Here, always consider providing an email address where you want to maintain further communication with DeployBot. Because DeployBot will send all necessary communication messages via email. After inserting the proper credentials, press the “Create an account” button.

Step 2: Add a Repository with DeployBot.
After creating an account, you will be redirected inside DeployBot, where you need to connect to a repository. To add a repo, hit the first highlighted option, as seen below.

After pressing the first option, you will be taken to the repo connection tab, where you will see multiple repositories like GitHub, Bitbucket, GitLab, etc. From here, we are selecting the GitHub repo to deploy codes into Kinsta. Then press the ”Connect new account” button.

Now, you need to allow an authorization request to build a connection between GitHub and DeployBot. To do so, press the “Authorize DeployBotOrg” button. This will permit a repo connection with DeployBot.

After authorization is granted, you will receive a message that says you will be redirected to the authorized application. Manually, hit the “setup page”, if you didn’t redirect.

Now, you need to select a repo for which you want to connect with Kinsta, the hosting service provider. Select a repo from the drop and down menu and choose the Label color. After that, press the “Connect” button. Thus, your selected repo will be connected to Kinsta. As a result, if you make any changes to that repo, the same change will be automatically made on Kinsta.

Step 3: Configure Environment Connection.
In the third step, you need to connect an environment by pressing the second option.
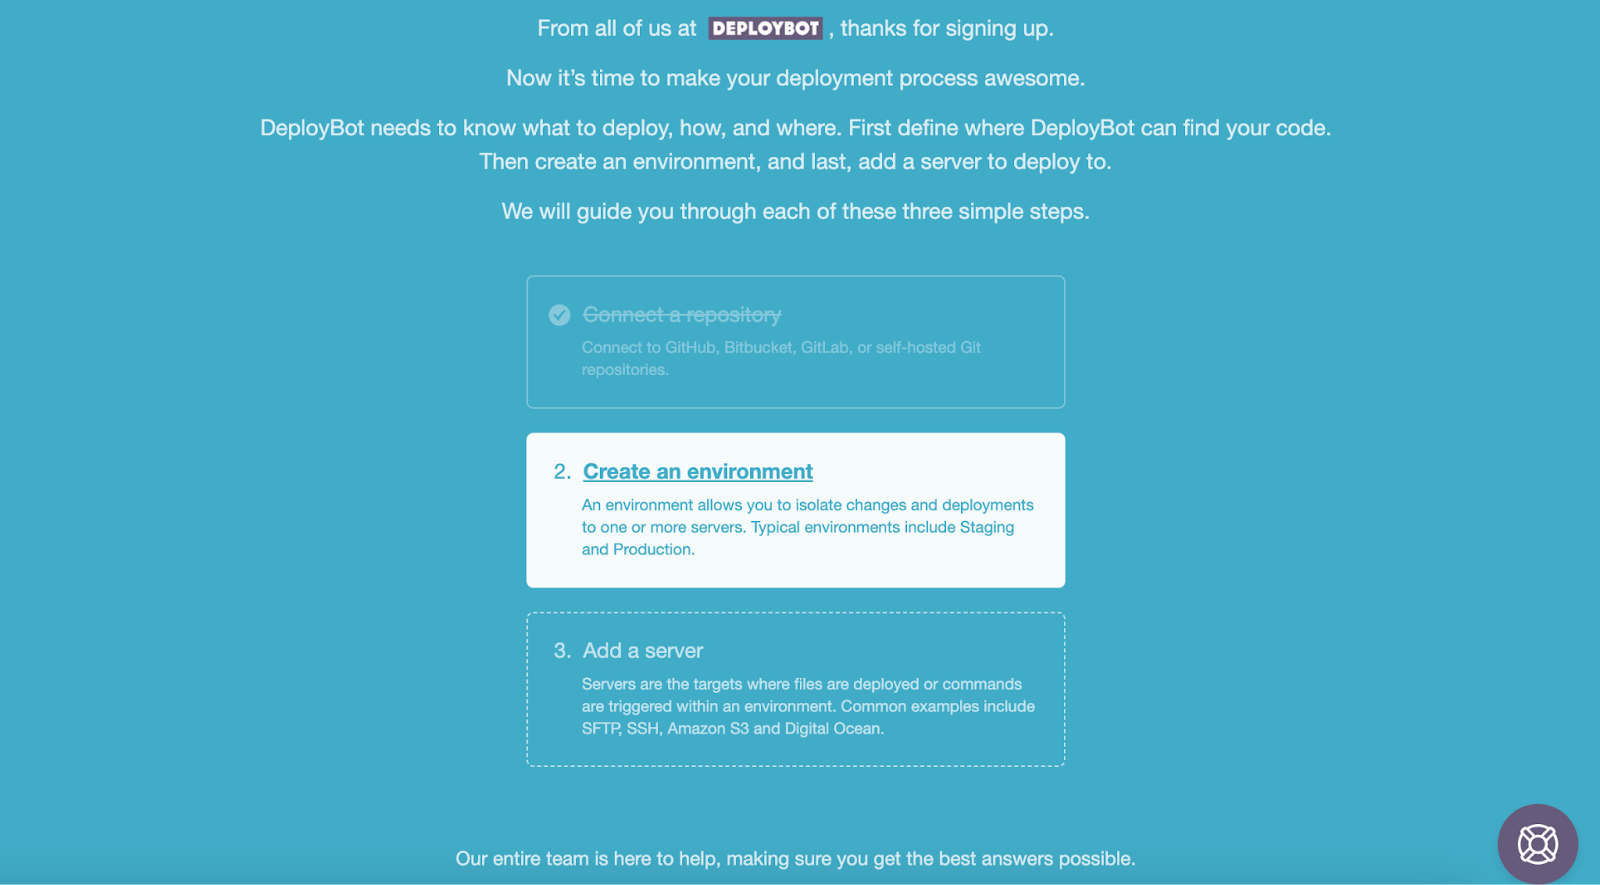
Now, you will see all the configurations for the environment connection. For the General setting, enter the Name and Color label for the environment. Then select the Manual or Automatic deployment you need. It’s important to mention that Manual deployment is good for production environments where in-person deployment prevails. On the other hand, Automatic is good for staging and development environments.
Since we’re deploying a staging environment, select Automatic deployment. Then select the same type of Branch you have created in the Git repo. This lets you deploy code whenever you make any changes on that staging repo. Finally, press the “Save” button to complete the environment setup.

Step 4: Set Up the Server in DeployBot.
In the last step, you need to add a server with DeployBot. To add Kinsta, go to “Server & Settings” and press “Add a Server”. Then, press SFTP to connect the site of the Kinsta server. This will take you to the server connection tab, where you need to insert further credentials that you will find in Kinsta.
Now, assuming you have your site added to your Kinsta server, get to your Kinsta Dashboard.

Go to the WordPress Sites tab to view all your added sites. Click on the site you want to connect with DeployBot via Kinsta.

After clicking on your desired site, scroll down a bit into the Info tab to find the Host, Username, Password, and Port of your site from the SFTP/SSH section there.

Now, in the General settings, enter Kinsta in the “Name” field. Then copy the necessary credentials and paste Host, Port, Username, and Password to add Kinsta with DeployBot. After that, hit the “Connect” button.

This will successfully connect your server with DeployBot. Now, enter the Destination path and press the “Write test” button.

This will again show a successful integration message.

Finally, scroll down and hit the “Save” button to complete the last attempt at a Kinsta connection with DeployBot.

Thus, your Kinsta server will be connected to DeployBot, and you will get to see it in the “Server & Settings” tab.

Automate Your Deployment Workflow Leveraging the Power of DeployBot with Kinsta
Now you know how integrating DeployBot with Kinsta hosting makes code deployments extremely straightforward and hassle-free. Not just with Kinsta, DeployBot also streamlines what can often be a complex deployment process across different other hosting providers like EasyWP, Cloudways, and WPEngine.
Its powerful features, like collaborative coding support, the ability to deploy to multiple servers simultaneously, and automatic rollbacks, make DeployBot a comprehensive deployment solution for developers and teams.
By following the steps outlined, you can now effortlessly deploy your code to the Kinsta hosting environment using DeployBot.
However, it's crucial to remember that regular monitoring is also essential to ensure error-free deployments every time. While DeployBot simplifies the process, keeping an eye on deployments can help catch and resolve any potential issues promptly.
With this integration setup, you can now boost your code deployment experience with Kinsta by leveraging DeployBot's capabilities while also maintaining proper observation to ensure smooth, successful deployments.
The combination of Kinsta's reliable hosting and DeployBot's robust deployment automation creates an efficient, streamlined workflow for managing and deploying your code changes without any major hurdles or complexities.
In case you encounter any problems during the integration or deployment process, the logs provided by DeployBot can be a valuable resource for debugging and troubleshooting. Don't hesitate to refer to these logs, as they can provide insights into what might be causing the issue and help you resolve it more efficiently.
Feel free to reach out to our support professionals for any additional guidance or clarification you might need. They'll be happy to address your specific concerns and help you successfully integrate DeployBot into your Kinsta server environment. Additionally, if you have questions regarding any other integration process, need assistance with configuration settings, or require further explanation on any aspect of DeployBot, our dedicated support team is ready to provide the assistance you need.


