How to Deploy into WPEngine using DeployBot
As a developer, you always want a seamless and hassle-free code deployment process. With DeployBot, pushing, building, and deploying your code becomes incredibly easy and straightforward.
If you have a WordPress site hosted at WPEngine and looking for a reliable automated code deployment tool to be integrated into your pipeline, then DeployBot is definitely the ideal option for you. It is easy to use and works seamlessly with a WordPress host run by WPEngine.
Let’s find out why you should consider DeployBot as your ultimate code deployment tool and how to easily integrate and connect it to the WPEngine server for your best deployment experience.
If you’ve read this far, you’re probably a DeployBot user and familiar with version control systems, CI/CD, and other related topics. If not, we’ve compiled several beginner’s guides: Laravel, Digital Ocean, Ruby on Rails, Docker, Craft CMS, Ghost CMS, Google Web Starter Kit, Grunt or Gulp, Slack, Python, Heroku and many more.
Why You Should Consider DeployBot for Deployment
For any programmer wanting to develop custom solutions for clients, DeployBot works excellently to keep repositories in control of hosted versions (like GitHub, BitBucket, or GitLab).
It has the ability to run build tasks on a cloud server before transferring via SFTP to the final destination. With this, you prevent generated assets (sass files, minified js) from being merged into your git repository. This keeps the commit changesets cleaner and prevents generated code conflicts while working within a team.
By choosing to deploy your code with DeployBot, you get to:
- Receive real-time notifications to stay updated with every deployment
- Evaluate deployment efficiency and enhance application reliability
- Eliminate the need for manual tracking of changes and file uploads
- Effortlessly revert to a previous release in case of any issues
- Share release notes to keep your team informed
- Utilize Docker Containers for efficient release package building
- Monitor deployment progress in real-time for better control
- Simplify server configurations with a user-friendly interface
- Easily manage permissions for your team and clients
- Enable users to deploy without requiring server access
Deploying into WPEngine Server Using DeployBot
With DeployBot, you can deploy your Git repository-based WordPress site to WPEngine via SFTP deployments. Below are the steps you need to follow.
Prerequisites:
1. Ensure that you have a DeployBot account and an active WPEngine environment.
2. Have your WordPress website project set up in DeployBot.
Step 1: Create SFTP login in WPEngine
First, you need to create an SFTP login in WPEngine. To do this, navigate to the installs page in the WPEngine user portal by going to the User Portal and select the WordPress installs from your dashboard that you’d like to create your SFTP logins for.

A login window will pop up, requiring you to insert the user information. You’ll then need to create your SFTP login with:
- Username — Your environment name will be appended to this automatically after saving:
- EX:
<em>environmentname</em>-username
- EX:
- Password — You can securely generate a random password by clicking the lock icon, or set a password with the following requirements:
- At least 8 characters
- Uppercase and lowercase letters
- Include numbers and special characters
- Once the password has been set it cannot be viewed again. If you lose the password, you will have to set a new one. Be sure to copy or write the password down before saving.
- Path (Optional) — A specific directory to connect to. Defaults to the root (topmost directory) if left blank.
- Must be a relative path, starting with a forward slash.
- Do not include HTTP/HTTPS, or your domain.
- Any subdirectory below the path defined here can also be accessed. Any directory above the path defined cannot be accessed.
- To restrict a theme developer to all theme directories:
/wp-content/themes/ - To restrict a vendor to media uploads from April 2019:
/wp-content/uploads/2019/04/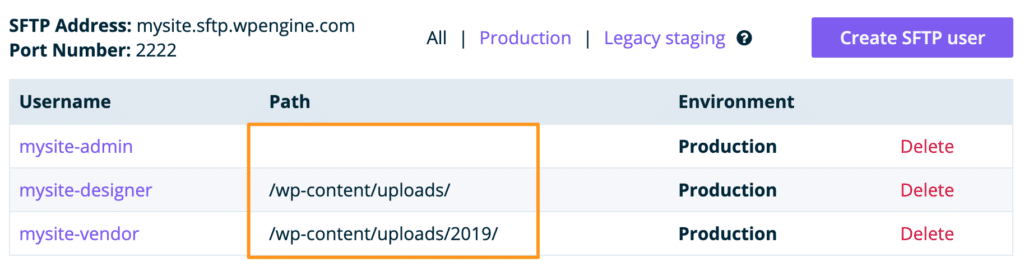
- Environment —
- Production, Staging, or Development: Refers to the active environment.
Step 2: Add a WPEngine server into DeployBot
You have your SFTP login created, now you need to add WPEngine as a server to deploy to in DeployBot. The easiest way to do so is to click on "Add Server" in the Server & Settings section of DeployBot for the environment you will be connecting to:
On the “Add a new SFTP server” page, you will have to enter your WPEngine Server details, such as Name, Host, Port, Destination Path, Username, and Password.

Keep a note that in the Name column, you should choose a Title that is easily memorable. The Host column can include either your server's IP address or a DNS entry, such as install-name.wpengine.com. Insert 2222 at Port, as that is what WPEngine SFTP uses.
As for the Destination path, you can specify the path to your site here, just as you can with WPEngine’s path. If you would like, DeployBot can handle deploying to an additional directory that you can specify. Otherwise, leave it blank. Lastly, for the Username and Password, simply use the SFTP login credentials that you have created in WPEngine.
Should you be in search of a more secure method of authentication beyond the traditional username and password login, you can utilize SSH access keys to ensure greater security while saving you time and providing a higher authentication method protection. Authentication via SSH key is the only way to access the SSH Gateway system on WP Engine. It primarily allows you to securely connect remotely from your local machine to the container hosting your website's content.
Step 3: Make necessary changes to DeployBot settings
Now, you can make any changes necessary to your repository settings after entering your SFTP login information, such as excluding file paths from deployment or choosing the current commit from which to deploy.

Once settings are changed as per your requirements, click ‘Save’.
Step 4: Establish WPEngine SFTP connection
After saving the changes at the bottom of the page, DeployBot will establish your WPEngine SFTP connection.
As soon as DeployBot forms a connection to WPEngine, a message "Connection Established" will appear on your environment's Servers & Settings page.

Step 5: Start Deployment
Congratulations! Your WordPress website is now ready to be deployed into WPEngine. Click on ‘Deploy’. After that, before starting your deployment process, you will see a page where you can add any deployment notes to your team members and preview the files that you are going to deploy from your WPEngine server. Once you have reviewed them, simply press ‘Start deployment’ and witness your code get magically deployed.

In the same way, you can deploy your other WordPress sites to WPEngine by setting up your SFTP login information in DeployBot.
Ensure the Best Use of Your Code Deployment Process Integrating DeployBot Into WPEngine
Following these steps correctly, you can seamlessly deploy your WordPress website into WPEngine using DeployBot, automating the deployment process and ensuring a smooth transition of your website to the live environment.
Once everything is set up, you can even manually trigger a deployment by clicking on "Deploy" in your DeployBot project dashboard. It will then fetch the latest code from your selected repository branch and securely transfer it to your WPEngine site via SFTP.
Not to mention, subsequent pushes to your selected branch will trigger automatic deployments, keeping your website up-to-date with the latest changes.
Make sure to keep an eye on the progress and view logs within the DeployBot dashboard to ensure a successful deployment. After deployment, thoroughly test your WordPress website in the live WPEngine environment to verify that everything works as expected.
If any issues arise, refer to the logs for debugging purposes. Confused or still having issues with integrating DeployBot into your WPEngine server? Feel free to reach out to our dedicated support team for any additional assistance.


