Using Docker Containers to Build your Code

What is Docker?
Docker is an open source tool that enables developers to deploy an application inside an isolated sandbox (known as a container), that is run on the host operating system. Docker containers provide full process isolation for an application by packaging everything needed to run the application including its code, dependencies, system tools, runtime, settings, etc. By isolating the software from its environment, Docker ensures that the application is able to run uniformly and consistently in any supported environment whether it be in the public cloud, a private data center or on a developer's personal laptop.
Before we go any further, let's get some terminology out of the way. You'll see the following two terms used throughout the article:
- Images - An Image is an executable package that includes everything needed to run an application, e.g. the code, dependencies, runtime, configuration files, environment variables, etc. It is the blueprint that forms the basis of a container. After you create an image, you can then host it on a registry like Docker Hub where others can access it, download it to their machines and run it.
- Containers - A Container is a runtime instance of an image. The act of running a Docker image creates a Docker container. The container runs the actual application that was packaged inside it.
Advantages of Using Docker for Development
- Consistency - By using Docker containers, you can create standardized environments that are consistent no matter where they are run. These can easily be shared among team members ensuring that each person is running code under a similar setup. This eliminates the time that would be wasted by each engineer in setting up their environment to run the code. It also enables development teams to easily set up repeatable development, test, staging and production environments that can be quickly scaled up, since all that would be needed is to make a replication of the container for a certain environment.
- Speed - Running an application is faster with Docker than with other technologies such as Virtual Machines. With VMs, to go from Zero to Running, the OS has to be booted up and other processes started before an application can be run. With Docker, a container is created with the least amount of resources it needs to run. Resources can be created and destroyed or started and stopped with little overhead.
- Isolation - Docker ensures that applications run in an isolated environment. Not only is this good for security since you will be able to run and test code without fear of malicious software attacking your machine, or accessing other containers, it also saves you from clogging up your system by installing software and libraries needed to run the code you work with. With Docker, each container comes with its dependencies and after you are done, you can just delete the container which will be completely removed from the system. It won't leave any configuration files, which is usually the case when you delete software from your system.
- Lightweight - Containers leverage and share the host's kernel, filesystem drivers and network stack and generally don't run services that are not needed by the packaged application; they only run the packaged application. This makes them lightweight and easy on your computer's resources, compared to VMs that run a full-blown OS thus utilizing a lot more resources in terms of disk space and memory.
If you've read this far, Continuous Development is obviously an issue for you. However, if you need to update more than one server, automation makes sense. This is exactly what we offer with DeployBot. DeployBot integrates perfectly with the most popular tech. You can find an ever growing collection of beginners’ guides on our website.
Laravel, Digital Ocean, Ruby on Rails, Docker, Craft CMS, Ghost CMS, Google Web Starter Kit, Grunt or Gulp, Slack, Python, Heroku and many more.
Learn how to get started with DeployBot here.
Using Docker with DeployBot
When building and shipping software, there are a number of tasks that usually need to be done before an application is deployed. These include:
- Minifying files
- Optimizing images
- Preprocessing CSS
- Transpiling JavaScript
- Running code through a linter
- Running tests
- Invalidating caches
- Creating and/or moving files
- Compiling source code into binary code
- Packaging the compiled code for distribution
- Generating documentation and/or release notes
Continuously typing out commands each time you deploy code is not only cumbersome, but it’s also error-prone. When working in a team, each member of the team has to be aware of all the build steps to take to prepare code for deployment.
Making use of a build tool can greatly improve your development workflow. With a build tool, you can automate some of these tasks, saving your developers from having to do redundant work. A build tool also helps you maintain a repeatable build process that is less error-prone as it guarantees that each person working on the project will be running the same up-to-date commands when building and deploying their code.
DeployBot provides Build Tools that you can use to prepare your code for deployment. When setting up your Server configuration, you can specify some commands that DeployBot will use to process your code, before deploying the resulting code to the server. It does this inside a secure, isolated Docker container on the DeployBot servers.
How Does it Work?
To use Build Tools, you first specify an image that will be used to create the container that your build script will be executed in. You can select this from our predefined images or from the official Docker registry.
When you deploy your code, DeployBot attaches a version of the code to the selected container and executes the build script inside the container.
If the build script executes successfully, any files or directories that were added or modified as a result are then deployed to the server. If the build script failed (had non-zero exit code), the deployment is stopped and marked as failed
Setting Up Build Tools
As mentioned, DeployBot makes available two images that you can base your container off of - Ubuntu 16.04 and Ubuntu 14.04. Both of these have been set up for general programming use. Compilers for different languages have been installed as well as different databases and development tools such as Git, cURL, Maven, RVM, etc. Check here for a list of what comes bundled with each image. Both images are publicly available on Docker Hub. Presently, we recommend using the 16.04 version. Version 14.04 is provided in case you need backward compatibility for your software. If you use this version, be aware that it will only be supported until April 2019. A Ubuntu 18.04 image will soon be made available.
If either of the available images doesn't cater perfectly to your needs, you can search Docker Hub for a more fitting one to use and add it to DeployBot. If you or your organization have a custom configured image that you'd rather use, you first need to push it to Docker Hub before adding it to DeployBot. At the moment, we only support the Docker Hub registry for hosted images.
To add an image to DeployBot, head over to Settings > Containers on your Dashboard.

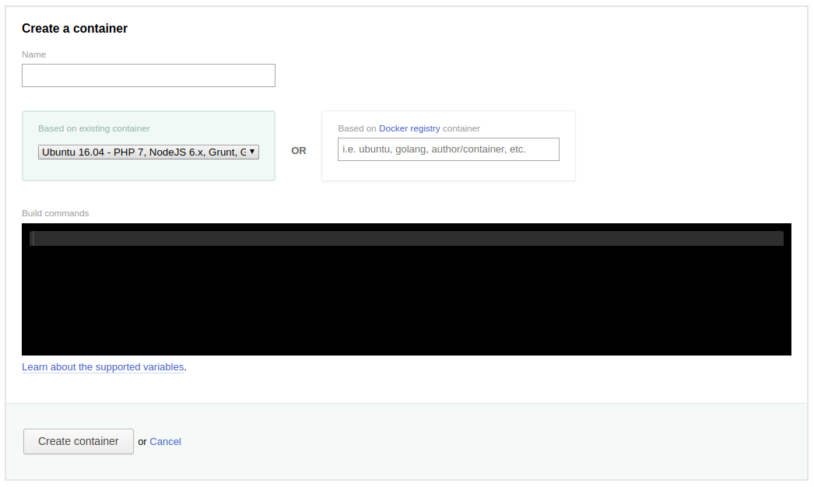
On the page that appears after pressing the Create a Container button, you will be able to specify config settings for the container. If you have some commands that should be executed each time the container is run, you can specify them here.

After adding a container, you can then use it when setting up Build Tools in your server settings. You can find this in the Compile, compress, or minimize your code section. Note that the Heroku server settings page doesn't have this section since Heroku has its own build tools that it uses to build your code before deployment.

Any commands you set here will be executed as a script every time your code is deployed. The resulting code will be written to the /source directory. When all commands execute successfully, all files in this directory will be deployed to your server.
Cached Build Commands
For better performance, you can use Cached Build Commands to prevent some commands from unnecessarily running each time code is deployed. You can, for instance, use this for commands that prepare the environments, e.g. commands that install dependencies. These only need to be run when the list of dependencies changes, so as to install the newly added dependencies. If this is run with each deployment, dependencies get installed each time, thus slowing down the build.
To prevent this, you can place these commands in the Cached Build Commands field found in the Advanced Settings section.

Cached build commands are executed once and then the results are cached for reuse until one of the following files in your repository changes: package.json, gulpfile.js, Gruntfile.js, composer.json, composer.lock, bower.json, Gemfile, Gemfile.lock, project.clj.
You can also specify your own list of files on which the cached build commands will be re-run, by adding this as the first line of your script: # refresh: my-file.json, my-other-file.ini
Best Practices for Handling Dependencies
When handling dependencies, consider the following:
- Do not store dependencies in your repository. Use .gitignore to prevent them from being committed.
- To prevent the overhead that results in slower builds, use Cached Build Commands to ensure that dependencies are only installed when related files are changed.
If the build produces files not needed in production, like the node_modules directory that holds dependencies, you should exclude them from the upload to the server. You can specify what gets excluded in the Exclude certain paths from being uploaded section.

With that set up, you can now rest assured that DeployBot will build your code and prepare it for deployment. If anything goes wrong, nothing will be uploaded to your servers, so you won't experience any downtimes.
DeployBot makes the deployment process seamless and works with almost every tech you wish - like Laravel, Digital Ocean, Ruby on Rails, Docker, Craft CMS, Ghost CMS, Google Web Starter Kit, Grunt or Gulp, Slack, Python or Heroku for which we have an ever growing collection of beginners’ guides.


