Using Docker Containers to build your Code

Building and shipping software includes several tasks which need to be completed before you actually deploy an application. For example, this can involve minifying files, creating or deleting files, running automated tests, compiling source code, packaging applications, etc. Typing the same commands over and over again is not just inefficient, it's also prone to errors. Even worse: when working in a team, you have to make sure that each member knows all steps involved to prepare code for deployment.
Using build tools can significantly improve your development workflow, as those tools automate some of the tasks. This saves time and creates a repeatable build process. On top of that, build tools help to maintain a re-usable, error-free build process—ensuring that every team member runs the same commands when building and deploying code.
It’s really easy to use build tools in DeployBot: you can provide a script or single commands, and we execute them on our servers. All this happens inside protected Docker containers on the DeployBot servers, with your source code attached to it. In this article we’ll look at how to work with Docker containers in DeployBot—our own containers and alternative containers hosted on Docker Hub.
Using Build Tools in DeployBot: Step by Step
So, how does this work? Before we take a closer look at Docker containers and DeployBot, let's explore the steps which are usually involved when setting up and using build tools:
- First, you select one of our pre-defined containers or an image from the official Docker registry.
- Next, your script or commands are executed in that container. During the build process, DeployBot attaches a version of your source code to the selected container.
Please note: If the build script runs successfully, any new or changed files and directories will be deployed to the server. If the build script fails (with a non-zero exit code), the deployment will be stopped and marked as failed.
If you’ve read this far, you’re probably a DeployBot user and familiar with version control systems, CI/CD, and other related topics. If not, we’ve compiled several beginner’s guides: Laravel, Digital Ocean, Ruby on Rails, Docker, Craft CMS, Ghost CMS, Google Web Starter Kit, Grunt or Gulp, Slack, Python, Heroku and many more.
Docker and DeployBot: A Match made in Heaven
Docker is extremely helpful, especially for creating build environments. No tools or libraries need to be installed on your local computer or inside a virtual machine. Instead, you create an environment for each library or application you want to build. It's easy to discard and rebuild it whenever you need to. Do you need multiple versions of the same tool? Why not use different containers, so you don't have to worry about conflicts.
At the moment, DeployBot offers three predefined Docker images for your deployments. They're based on Ubuntu 18.04, Ubuntu 16.04, and Ubuntu 14.04. As Ubuntu 22.04 LTS was released a few days ago, we’re planning to provide a new Docker container based on that—so stay tuned for a brand-new Linux distro with new versions of Node.js, NPM, PHP, etc.
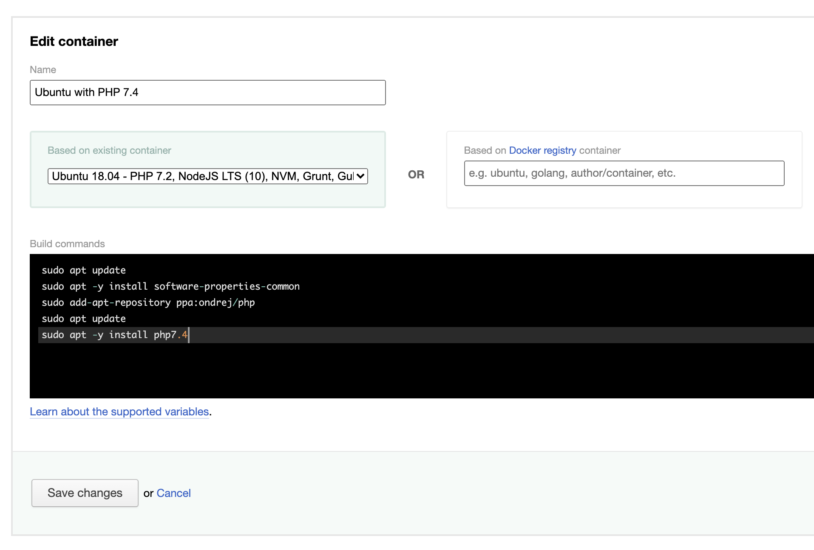
Alternatively, you can search for images on Docker Hub and use them to create your build environment. It's quite easy to add such an image from the Docker registry to DeployBot:
- Go to Settings / Containers in the DeployBot dashboard.
- Click Create a Container.
- Enter a name.
- Select the Based on Docker registry container field to the right and enter the image name from Docker Hub.
- If you want to execute specific commands inside the container, you can enter them in the field Build commands.
- Click Create container to save your settings and create the new container.

Also, if you need some advanced configuration or exotic software, you can always build your own Docker container.
How to use your own Docker Images in DeployBot
If you're not happy with the images at Docker Hub, there is always the possibility to build your own image. Whether you start from an existing parent image or whether you start from scratch with a base image, it doesn’t matter.
Now, there are two different approaches to creating Docker images:
- You can install Docker on the Linux distribution of your choice and write a so-called Dockerfile in the text editor of your choice. Tip: read the Best practices for writing Docker files before you start.
- You can use an external tool on your preferred operating system.
There are many tools for various platforms out there which support you in creating images, some Open Source, some proprietary applications. Some of them allow you to create and manage multiple images in parallel, some include a debugger to inspect your images. On top of that, there are tools out there which build optimized images for certain types of applications. The GitHub search engine or a web search engine are good places to start your research.
Once you’re done, you need to push your image to the Docker registry. You can register for a free Docker Hub account to get access to an unlimited number of public repositories. If you or your team are looking for private repos and maybe additional collaboration tools, you can sign up for one of their paid plans. For more information, have a look at Docker’s Pricing & Subscription page.
Conclusion
A common problem with CI/CD pipelines is that you have to manage multiple versions of the tools needed for building code—this requires a lot of time and effort. Using Docker containers to create the environment with all required tools is a much better and simpler approach and allows you to create isolated build processes which can even be executed in parallel. If you don't want to use the predefined containers which DeployBot offers, you can simply browse Docker Hub or create your own images.
Happy hacking!


