Deploying to Multiple Servers at the same Time

There are plenty of reasons to deploy your code to more than one server. Maybe you have different instances of a software, or you want to deploy only certain pieces of an application to one server and other parts to different servers. Instead of uploading your files over and over again, why not let DeployBot handle this for you?
Mass Deployment at your Service
After you’ve set up your environment in DeployBot, you can add one or more servers to it. DeployBot supports deployments to DigitalOcean, Shopify, Heroku, AWS Elastic Beanstalk, AWS S3, Rackspace Cloud Files and all Linux based servers. It can also deploy anywhere else with SFTP, FTP, etc.
Furthermore, it’s possible to use different protocols, like FTP or SFTP. For each server you can run different scripts and define individual webhooks. You can even configure specific commands for every server and determine when they should be executed—before or after deploying.
By the way, if SFTP is the protocol of your choice, you may find DeyployBot’s Atomic SFTP feature useful. Read this blog post to find out more:
How to set up Multiple Servers in DeployBot
Well, the first step obviously is to connect your repository, and after that you create your environment. This is the place where you add servers and finally manage your deployments.
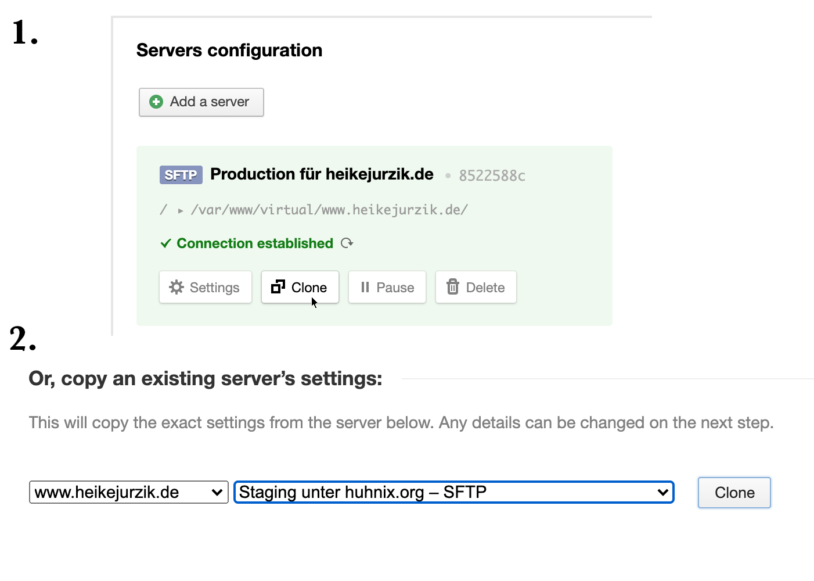
Next, you add your first server to the environment. To configure another one, you can click on the Add a Server button again—or you can choose a shortcut and clone an existing server. There are two ways you can achieve this:
- Click the Clone button in an existing configuration.
- Click Add a Server, scroll all the way down and then choose Or, copy an existing server’s settings. Select a repository and a server from the drop-down menus below and click Clone.

In both cases, DeployBot copies the exact settings from the selected server and opens the configuration dialog. Here, you can adjust the server's name, the destination path for deployments, trigger webhooks, and add configuration files to your app directory.
You can also enter different commands for compiling, compressing, or minimizing your code. DeployBot executes them on your server for you, which is ideal for compiling source code or testing it. DeployBot can also run shell commands on the server before the deployment happens or after finishing the upload. Finally, you can set up triggers for webhooks after the deployment is done.
Automatic deployments
Of course, you can also set up automatic deployments, for example for your staging environments. Everytime you push to your repository, deployments to all connected servers will be triggered. Even when you’ve set up manual deployment, i.e. for a production environment, there is no need to deploy to multiple servers manually. Adding more than one server to DeployBot’s dashboard saves time and effort—and helps to avoid mistakes.
Just a side note: let’s say you’re deploying to 100 servers and the deployment is successful on 80 of them, but fails on the other 20—in this case DeployBot makes sure to take back the changes on those 80 servers as well and marks the entire deployment as “failed”.


