How to Configure a Custom Server Through FTP with DeployBot
Connecting a repository using a custom FTP can be handy for those who don't use Digital Ocean or Heroku. If you use a different hosting platform or use your own servers due to security and privacy issues, DeployBot has you covered.

Here’s what you need to do.
Log into your DeployBot dashboard and add a new repository as usual. Here you can add the environment stage that allows you to have either an automatic or manual deployment.
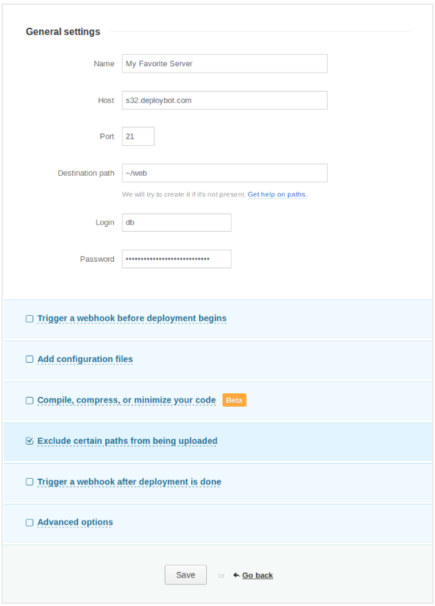
Next, add a new server. Here you’ll have a few options to consider. You can add a web application like atomic SFTP, DigitalOcean, Heroku or others which allow atomic deployment with zero downtime. You could use a simple file upload option where you upload files to a server or CDN. In that case, you have a few options including FTP and SFTP, but for this topic, we’ll focus on FTP. Once you’ve selected the FTP option, you’ll need to add a new FTP server. Here you’ll provide some additional information including name, host URL, port and login credentials.

Now that you’ve completed the general settings, you have some choices to make. You may want to trigger a webhook before deployment begins. It can send an HTTP POST request with JSON formatted data about deployment to a specified URL before a deployment to this server. You could add configuration files which override any existing files with conflicting names in the repository, and will be available during the build. Another option is to compile, compress or minimize the code, exclude certain paths from being uploaded, and trigger a webhook after the deployment is done.
After DeployBot verifies the data and that the connection is established, if everything is okay, it will send the user to the server configuration. At this point you can decide whether to perform some changes or simply deploy your code. When you start a new deployment, you’ll notice that the configured FTP server appears in the review and deployment section. If you want to ensure the connection is established, go to your server and see through FTP connections that DeployBot is now connected.
Now you have a custom FTP connection connected to DeployBot and the repository. Now you can make changes to the repository and DeployBot will automatically view them and deploy them to the selected server.


