Front End Deployment of a React App
No too long ago, frontend work was pretty straightforward. The backend team took templates that were converted from PSD to HTML/CSS and added them into deployment. But everything changed when JS and the frontend frameworks came into the picture. Now that you can easily create apps using JS, you need to have a deployment process for that as well.
This post focuses on creating a simple ReactJS application with real-time deployment and shows how a simple but very effective workflow would look like.

Let’s start by using the create-react-app package built by the ReactJS team. This creates a simple ReactJS app structure with everything pre-configured including Babel, Webpack and other dependencies.
Create this project by simply running the ‘npx create-react-app my-app’. Make sure to have the latest NodeJS, npm or yarn version. After the project is placed into a github or bitbucket repository, we connect it with DeployBot. On github, as you'll notice from the create-react app, the build folder is ignored. This is because the project is built into an optimized structure, where the code is compiled and minified by running the ‘npm run build’ command, before deploying.
Now that we know how the create-react-app structure works, we can continue to DeployBot to configure two different deployment environments which will help us create a well defined process of deployment. The first environment we will name testing and the second one production. Take a look at Getting Started With DeployBot for more information on environments and connecting repositories.
On the testing environment we will connect our preferred server, which could be Heroku, DigitalOcean or a SFTP. We will keep the deployment process automatic so that for each commit a deployment will be triggered. We won't bother to optimize anything since the server will be used for testing and not for production. Obviously, it is a rather simple environment, unlike the next one.
The second one is a bit more complicated, and we will name it the production. This environment we will connect to our servers the same as the other one above. But in this case we keep the deployment process manual rather than automatic. This is the environment to which we will deploy, so the client can see. Keeping the deployment process manual provides for a more controlled deployment.
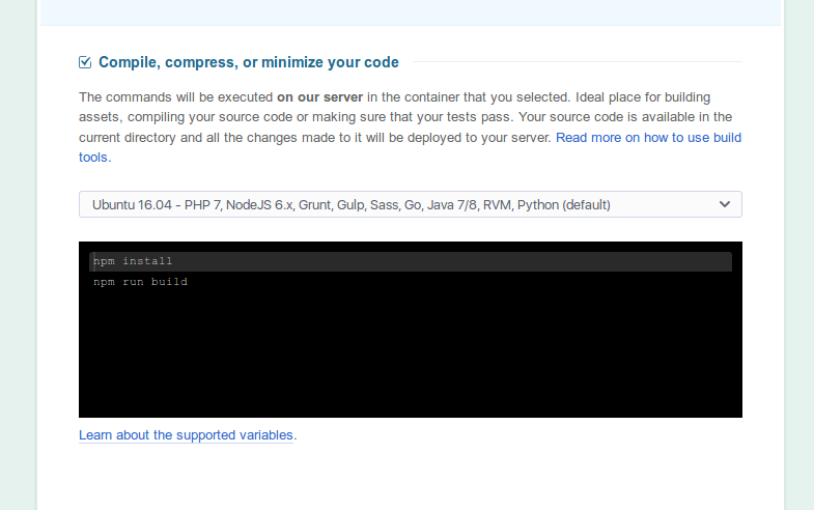
There are a couple of changes that will need to be made. We need to specify the server settings as well where we can choose the “compile, compress or minimize your code” section. Plus we need to add a bunch of commands that will be executed to the server and changes that will be deployed. If we are using the create-react-app, we can use the already configured build by ‘npm install’ and ‘npm run build.’ That optimizes the project and makes it ready for production, although it can easily accept any other custom configurations that your project might have.

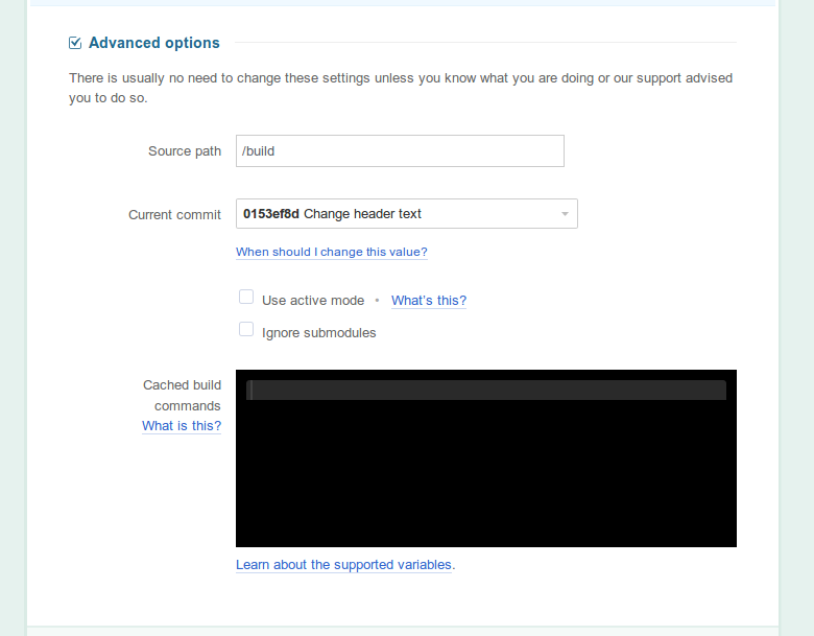
One last thing we need to take care of is to go to the advanced options and select the source spot to “/build”. This will inform DeployBot that the files that require deployment are inside the build directory. So only the optimized files are going to be deployed. This way we can use the same repository, initially created for testing, for deployment to production.

This workflow keeps your work clean and ready to deliver in a matter of seconds. With a testing environment you always have a server available for testing. This allows your team to observe and notice any potential issues beforehand. Having a predefined environment for production means the deployment to production is a simple yet very effective process.
Instantly build and ship code anywhere in one consistent process for your entire team. Try DeployBot today!


