Deploy your applications to Elastic Beanstalk in one click
Elastic Beanstalk (no, not that Beanstalk) is a great way to leverage the power of Amazon’s cloud computing platform. Today, we’re glad to announce that you can deploy your application from a Git repository to Elastic Beanstalk using DeployBot. In this post I’m going to explain why it’s a great idea and how you can get things up and running.
Elastic Beanstalk is one of the easiest ways to run your app in the cloud, but the deployment procedure itself can be tricky — you need to either manually upload a zip file with your app through the sometimes complex AWS Console interface or hook up your local Git setup to the AWS API with a bunch of console tricks and tools. By leveraging DeployBot’s integration, with a few clicks you can set up a system where you get all these benefits:
- Single click: All your pushes are deployed to Elastic Beanstalk automatically or on your request
- Preview deployment: You are able to preview the changes to be deployed
- Permissions: Manage permissions of who on your team can deploy to which environment
- Notifications: Notify your team on each deployment through email, Slack, Hipchat or Campfire
- History: View a history of all deployments, showing who triggered each and what was deployed
You also get much more than that — like the ability to deploy to multiple targets as part of the same deployment procedure, like deploying assets to S3 while you deploy your main application; or a way to notify New Relic about your deployment to make sure your performance stats are taking your deployments into account. The list goes on.
To get up and running, first you need to get your free DeployBot account and connect your repository, if you don’t have it yet. Then proceed to configure the integration with AWS.

On the Integrations page (at the top navigation bar), you will find a settings form for your AWS integration. To get your access key and secret key you can create Amazon’s IAM user, if you don’t already have one. Make sure to attach Power User Access policy to it so that we have permissions to update your environment (with great care of course).
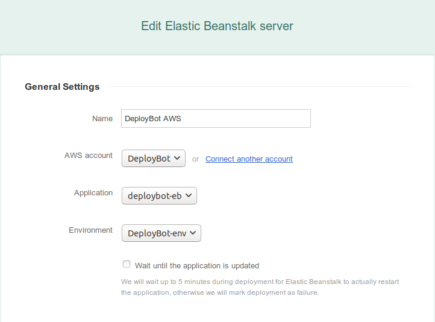

After your AWS account is connected, you can now move to create a new environment in the Deployments tab and add a new Elastic Beanstalk server. Then you can select what application and environment you want your repository to be deployed to and this is all we need to know to deploy your code.
Now that you’re done with the configuration, you should be able to go to your environment through the Deployments tab and deploy whatever commit you want to be deployed. After the deployment is done, Elastic Beanstalk may take some time (depending on the load) to refresh your environment and restart the instances running your app, and once that’s done, your changes will be live.
Elastic Beanstalk is amazing. With DeployBot you can now let AWS handle scaling your servers while you and your team ship code with confidence and transparency. As always, please let us know what you think in the comments or through support. We have lots of other exciting things for you soon.


Comments